Keeping your Mac’s temperatures in check
With Macs becoming thinner and components being smaller and more crammed together than ever, you can expect internal temperatures to rise quickly. CPU’s and GPU’s become more energy efficient every year but they still run at the same, or higher, temperatures.
Even with the latest CPU’s and GPU’s being far more energy efficient, when a little workload is applied temperatures immediately shoot up. Heat and dust are the primary computer killers (not covering electromigration here), specially when they work together. So what can you do to keep your Mac’s temperatures in check? Read on to find out.
Where I grew up there was no air conditioning, we simply didn’t need it. Hot? Open a window and turn on a fan. While that worked for me, my computers did not appreciate the lack of cool air and even the G3 and G4 (which typically ran pretty cool) would get very hot very quick. The solution was simple, just open that Mac up and point a fan or two at it. The Mac would be OK and whatever dust was in there would blow out too.
Of course those days are long gone. Even the cMac Pro (Classic Mac Pro, pre-2012) does not really benefit from opening the side panel and aiming a fan at it. It needs the design for airflow to do it’s best work. The tMac Pro (trashcan Mac Pro, post-2012), well that’s a temperature disaster all together. Maybe the tMP could benefit from 3 fans hitting it at all angles but I doubt it. As for iMacs and laptops, of course there’s no good way to apply external cooling.
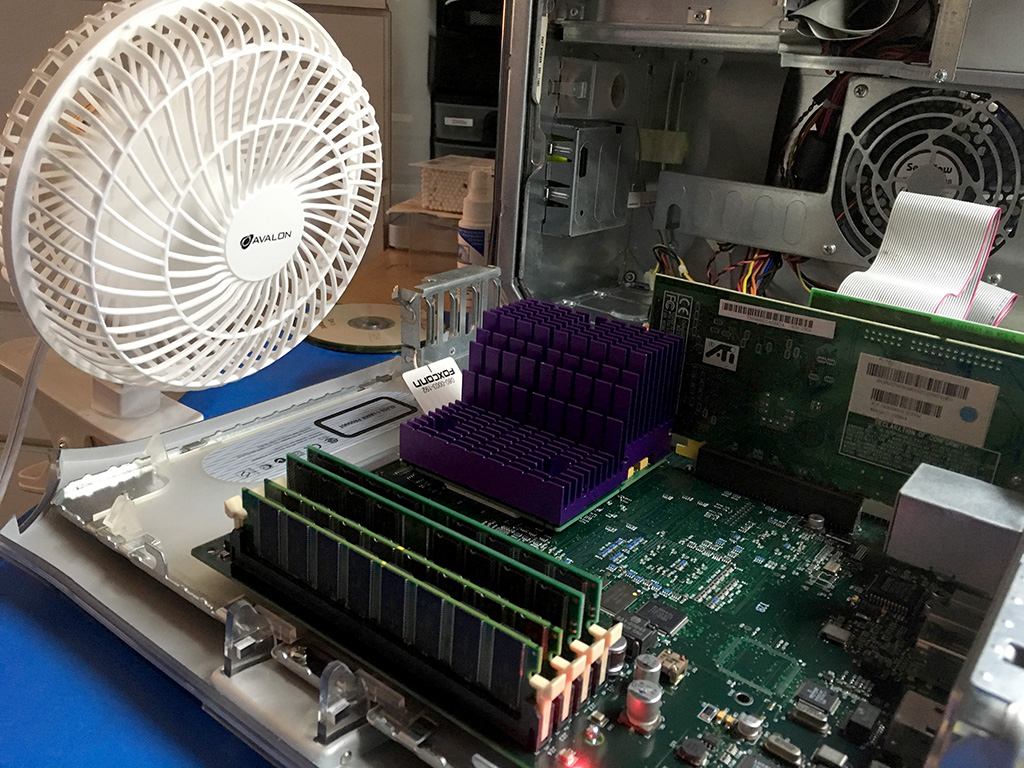
So what can one do? There’s actually a few things you can do to improve the temperatures inside your Mac. For the most part I’ll use my own Mac Pro as an example in this article but unless stated otherwise, these practices and procedures apply to all Macs.
1. Know the hardware specs and limits.
The components that will run the hottest in your Mac are:
– The power supply (desktop Macs) (PSU)
– The graphics card (GPU)
– The processor(s)
Closely followed by the rest of a system’s components:
– The memory (RAM)
– The Northbridge
– The hard drive
Of course everything in your Mac generates heat but the first three are usually the biggest heat generators.
First, lookup the specs of your Mac. There are several sources that can help you find out what’s inside your Mac, for example the Apple’s own tech specs page and everymac.com. For information you can’t find there is always the good old search engine. In my case I ended up with this list:
PSU: Delta Electronics DPS-980BB-2 rev. A
CPU’s: Intel Xeon X5675
GPU: ATI Radeon HD 5770
Northbridge: Newer than Intel 5000X
Storage: 4x HDD (Seagate and Western Digital), 3x SSD (Crucial)
And so the search begins. On Intel’s website the specifications of this specific CPU can be found, this should cover every Intel CPU used by Apple since 2006. Unfortunately not every component’s specs can be found that easily. You’ll have to find the best sources you can and compare information you find for an accurate average. With either the manufacturer specs available or an educated/estimated best guess, we end up with maximum temperatures of:
PSU: 75C
CPU’s: 81.3C
GPU: 85C
Northbridge: 105C
Storage: 60-65C for the HDD’s and 70C for the SSD’s
And because I could, RAM: 85C
Also important is the operating temperature listed by Apple, basically the ambient temperature the room the Mac is in should be. For my Mac Pro that’s 50° to 95° F (10° to 35° C). Power supplies pose a unique problem. Depending on the components used their ratings can fluctuate a lot. In the case of the power supply for the Mac Pro, no information can be found out there. It’s a 980W power supply but it could be rated for 980W at 25C or it may only output 400W at 50C and there is no way to guess what the output is based on temperatures and Apple’s pre-programmed fan behavior. PSU’s that can output at full power with 50C or more temperatures are pretty expensive as it’s a hard standard to meet. This is relevant information to have as it will tell me what my temperature limit must be to get the best performance out of my power supply. Sadly, I have no clue in this case so I will assume typically accepted standards. This information will be even harder to find for the Apple Power Adapters powering laptops as it’s internals are mostly proprietary. A good rule of thumb the internet appears to agree on is start worrying at 80C, freak out at 90C+.
My own comfortable temperature level I want to see in my Macs is 50C or less. 30C average would be nice but that’s near impossible.
2. Observe
Now that you know the maximum temperatures of the components inside your Mac, it’s time to see what’s actually going on under the hood. There are several applications out there that can show you internal temperatures, my top pick is Hardware Monitor by Marcel Bresink. If you don’t feel like paying or the free trial is not enough, pick any application that can let you see temperature lowest and highest values over time.
Using Hardware Monitor I observed the temperatures inside my Mac for a little over an hour as I continued running all my usual apps and doing all my usual activities. Here’s what I saw:
PSU: 89C
CPU’s: 65C
GPU: 80C
Northbridge: 76C
Storage: 49C
RAM: 61C
Ambient: 32-34C
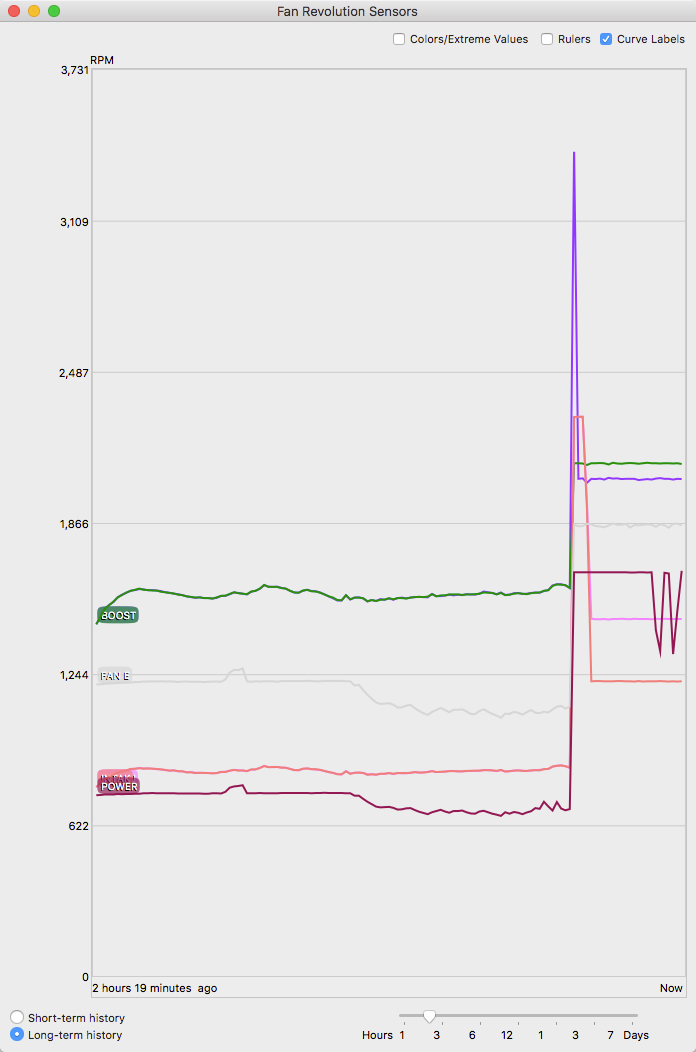
These temperatures could be higher but I stopped the test when the PSU approached 90C which is way too hot for my liking. So, apart from the PSU, within safe limits. During this test the fans did not leave their default idle speeds once, not even the built-in PSU fan. Sure the Mac runs whisper quiet but at what cost? With these kinds of temperatures the components won’t last as long as I want them to. During this test the average output was 230W with a spike to 355W once. Does this mean at temperatures past 50C it can only handle 23% output? I hope not but then again I did not run benchmark tests, encoding or decryption apps to tax the hardware 100%. Either way, these temperatures have got to come way down.
3. Clean the hardware
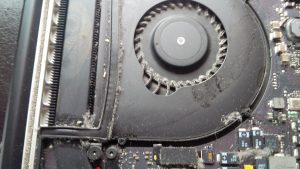
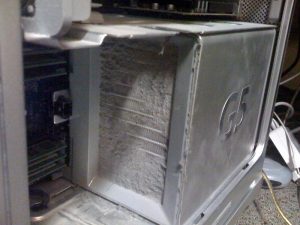
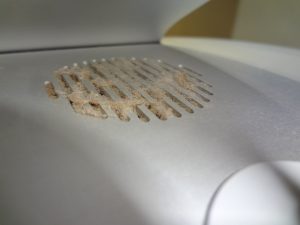
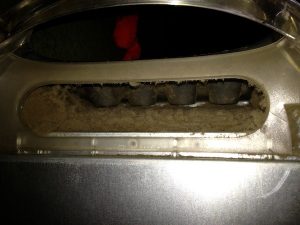
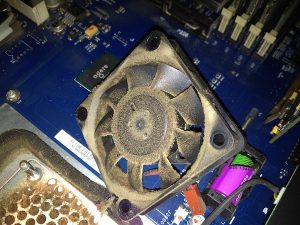
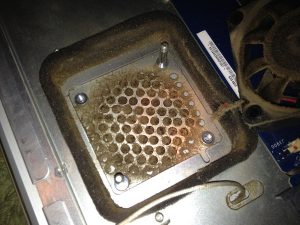
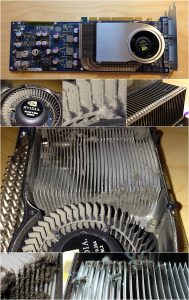
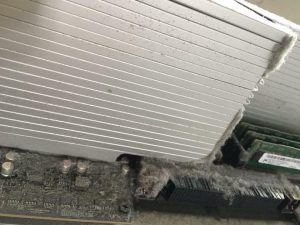
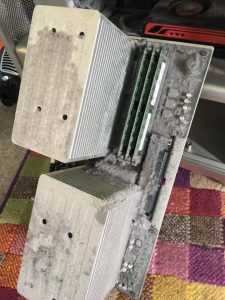
Shut down your Mac, open it up as far as you’re comfortable opening it and give it a good cleaning. Compressed air and an antistatic brush are your best friends, I do not recommend using a vacuum cleaner. Don’t worry too much about getting fans and heat sinks spotless, the Mac will blow that stuff out next time you start it up. Instead focus mostly on the rest of the Mac. I enjoy taking apart a Mac completely to clean it and just to nerd out a little but how far you go is up to you. Any cleaning is better than no cleaning at all. You want to avoid these situations:
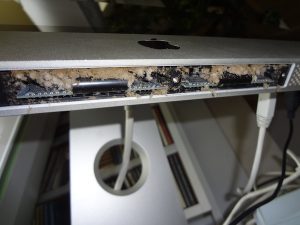
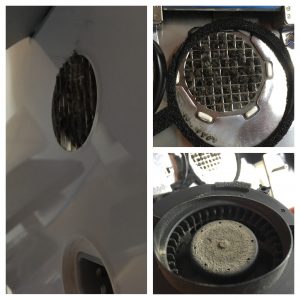
4. keep your Mac in a dust-free environment.
A flat, clean surface etc. Even a Mac mini or MacBook will suck up dust even though it technically doesn’t have air intakes. Keeping dust away from your Mac to begin with helps a lot.
5. Re-apply thermal paste
This will require you to take your Mac apart completely so it may not be for you. If you are comfortable taking a Mac apart, old or new, I actually recommend replacing the stock thermal paste as soon as you get the Mac. Used, new from the store, a few months old or a decade old. Have I lost my mind? Probably. But there is a reason I make such a bizarre statement; The thermal paste Apple uses sucks. It might be enough for a Power Mac G4 tower but certainly not for anything portable and/or Intel whether it’s an old Core 2 Duo, i5 or Xeon. It has no business being inside a computer you pay thousands of dollars for, period. This is going to be a bit of a rant but stay with me..
Both in the factory during assembly and in stores for repairs, Apple uses Shin-Etsu Microsi silicone based thermal paste with a thermal conductivity of 3 W/mk. The lowest I’ve found of all commercially available thermal compounds. The popular Arctic Silver 5 is rated at 9 W/mk and the newer and better Thermal Grizzly Kryonaut is rated at 12.5 W/mk. The higher the number, the better the paste is at transferring heat from the chip to the heatsink. You just paid $2,799 for a brand new MacBook Pro that needs all the possible help it can get to stay cool and you’re stuck with the worst thermal paste used in the industry, doesn’t sound like a good deal does it? But it gets better…
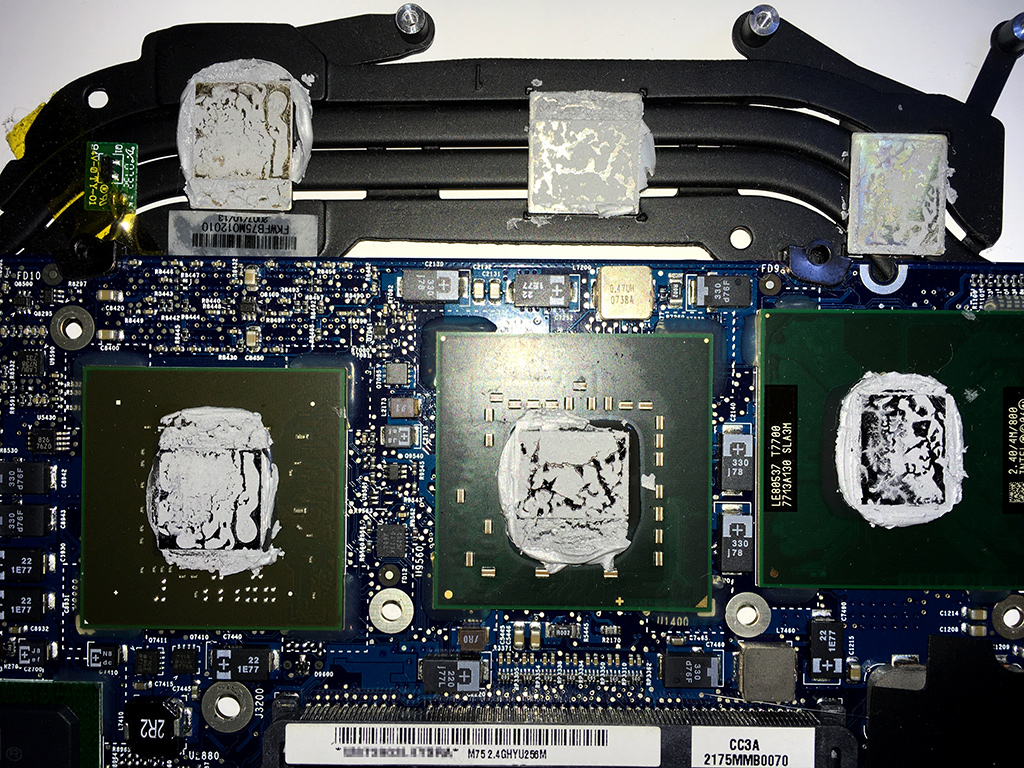
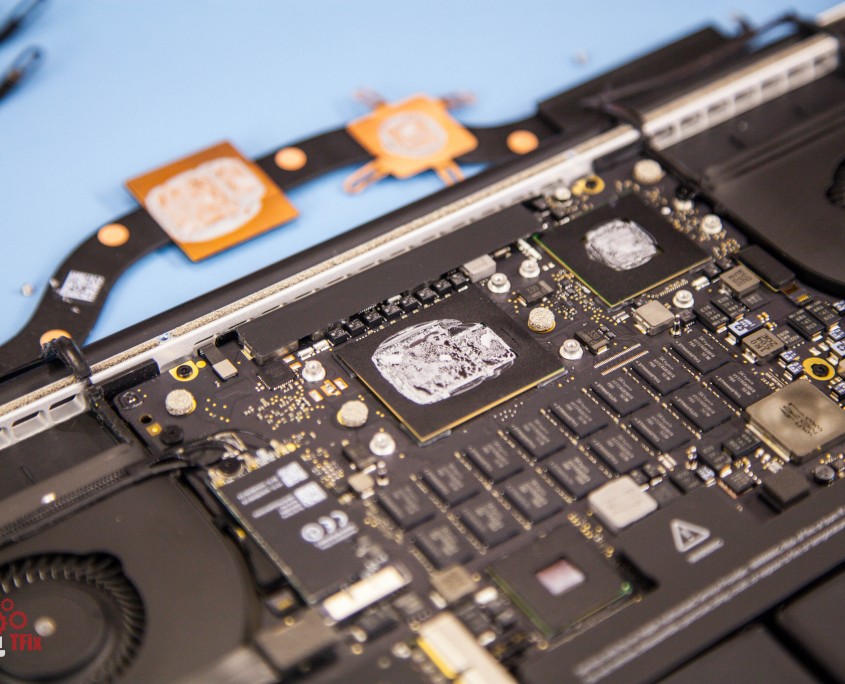
The way the thermal paste is applied is sloppy at best. In the factories the paste is typically not applied to the center of the chip but off to the side, causing most of the paste to spill over on one or two sides of the chip. The combining of board and heatsink is either done manually or by a robot that does it way too fast as there are a lot of air bubbles trapped in the paste or forcefully pushed out on all sides of the chip. Open up any Mac, and you’ll find something like this:
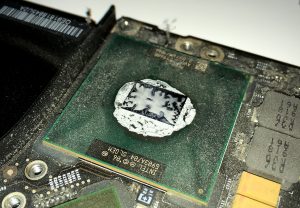
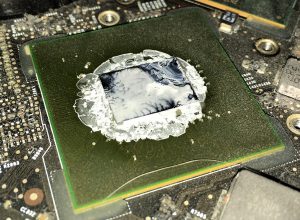
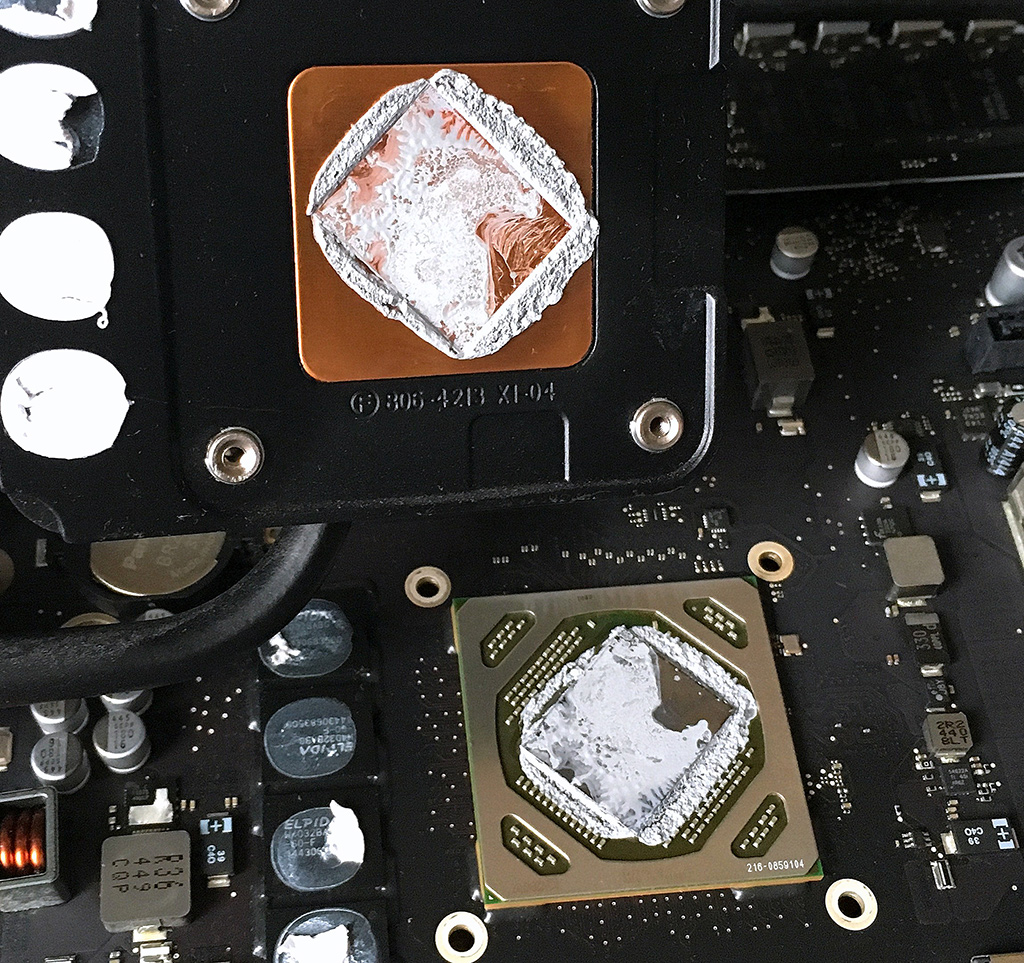
Excessive use of paste, not enough coverage and/or not enough contact due to air bubbles trapped or pushed out (pushing paste out along with it). You’d think that whatever paste is not on the chip is stuck on the heatsink but you’d be wrong. Here’s another example with the chips and heatsink side by side, you’ll see that whatever was not covered on the chip is also not covered on the heatsink.
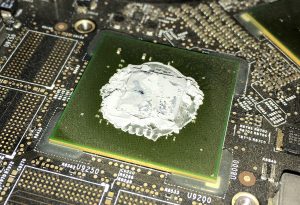
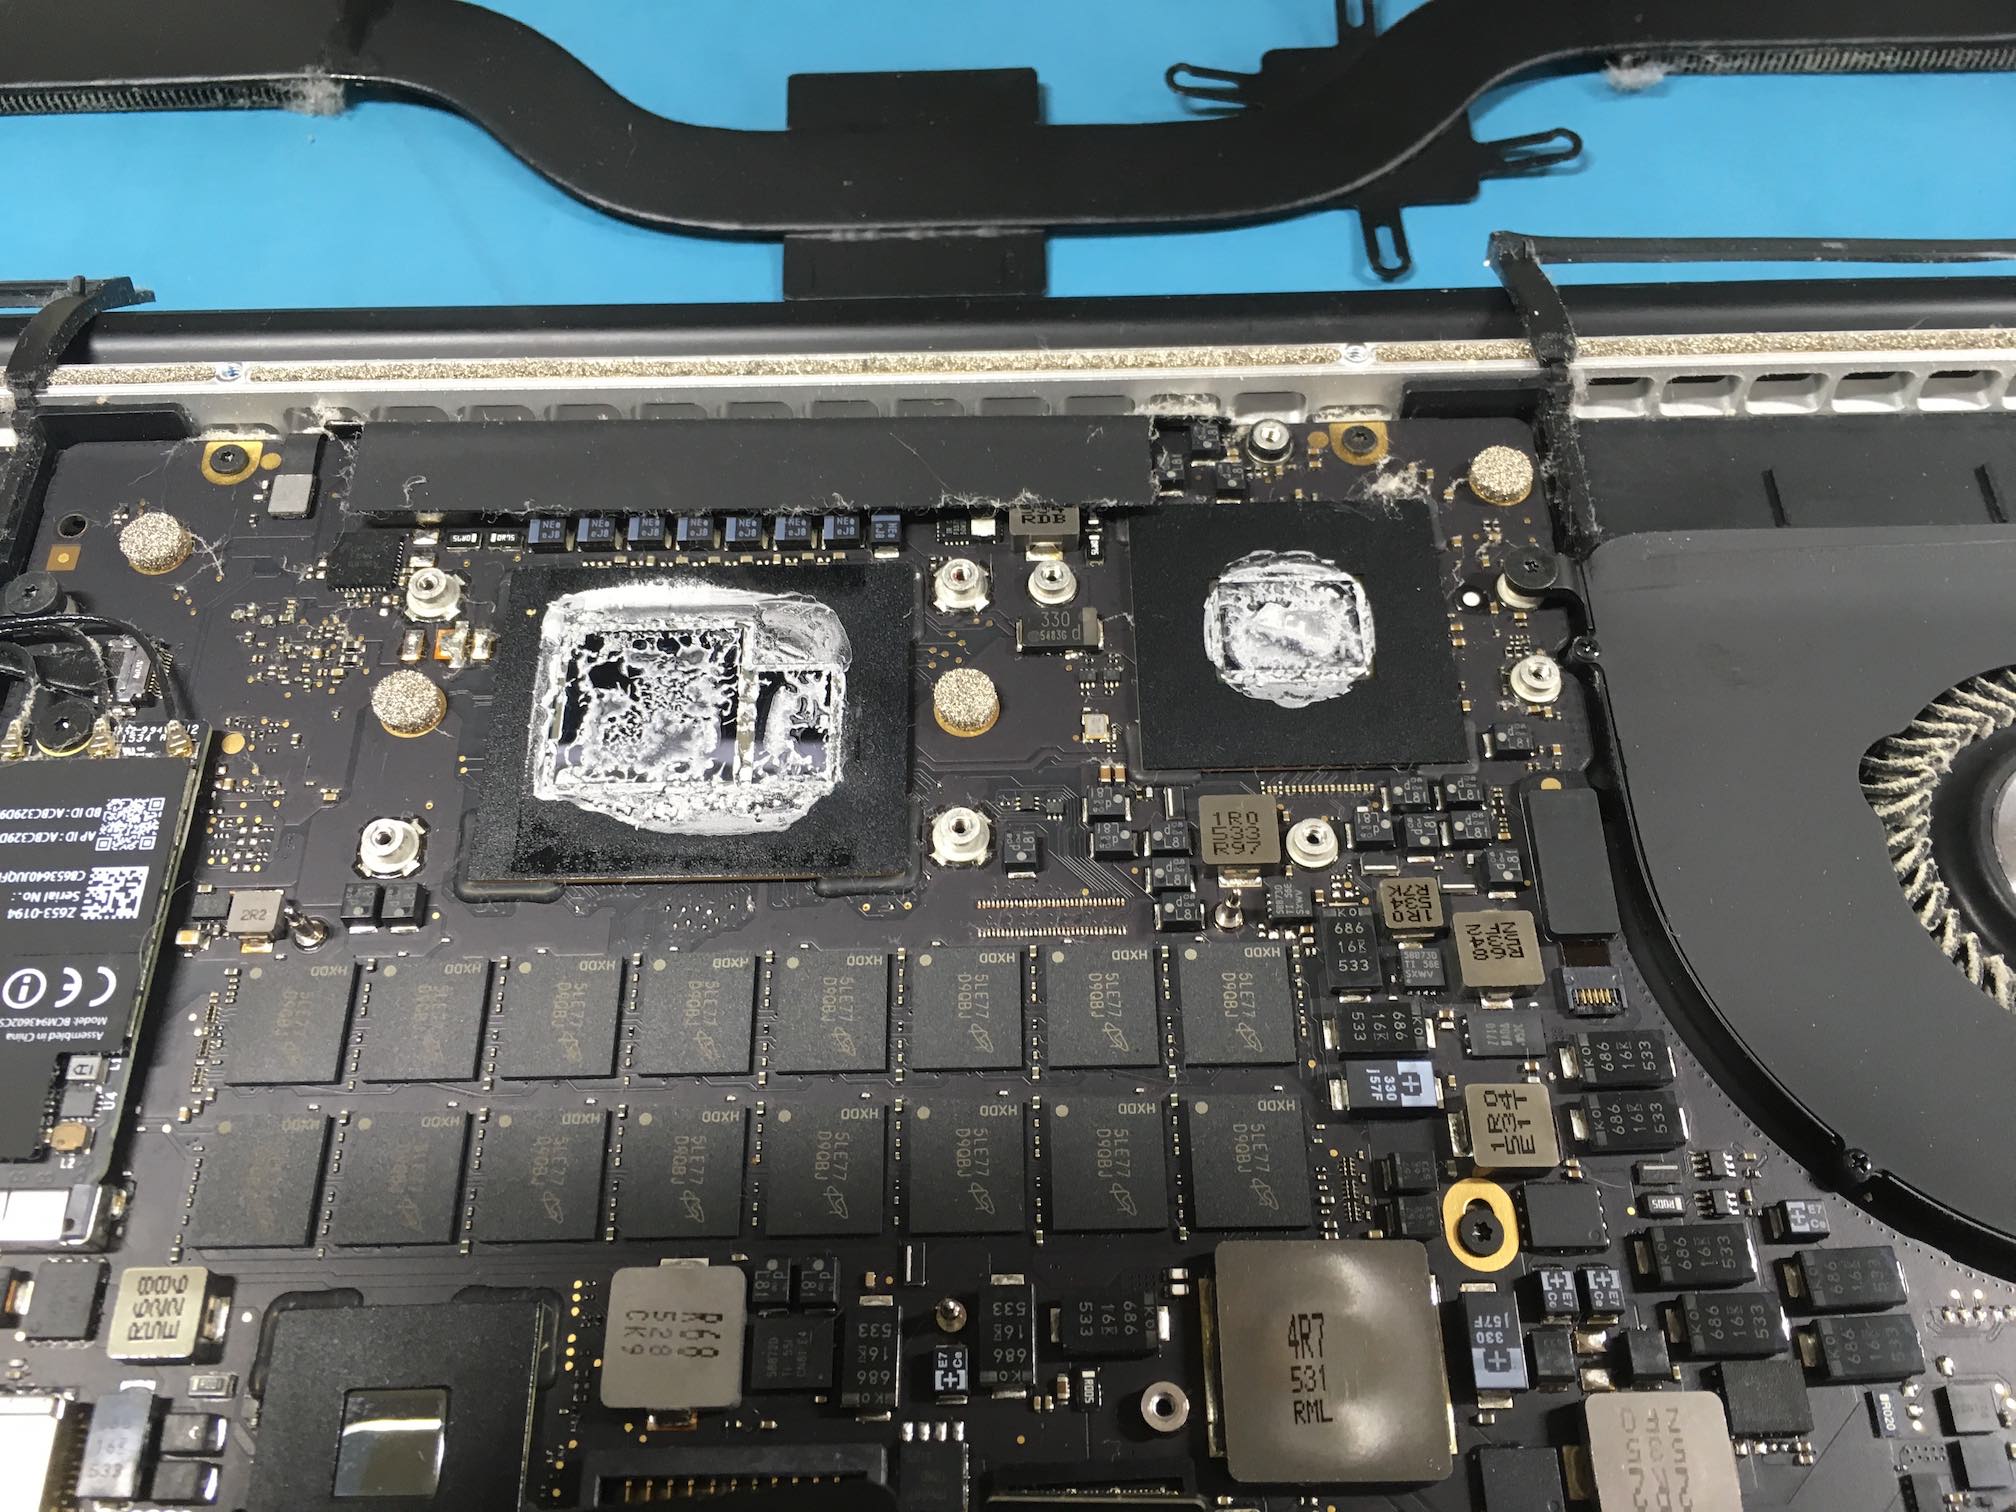
I have tons of photos that prove the point from many Macs between 2000 and 2017, desktops and portables alike, it all looks the same. But in case you’re still thinking “no way that’s still the case in the latest Macs”, here’s the situation inside of a Mid 2014 Retina MacBook Pro:
And here a 2015 Retina MacBook Pro:
And finally a 5K iMac:
These last few images are not my own but illustrate the point perfectly.
A chip needs to be covered evenly and entirely for it to do it’s job. Not some of it, not most of it, all of it. These chips are incredibly complex and every part of it does something different. For example here is the Die of an Intel i7 Nehalem, used in some models iMac, Mac Pro and XServe a few years ago:
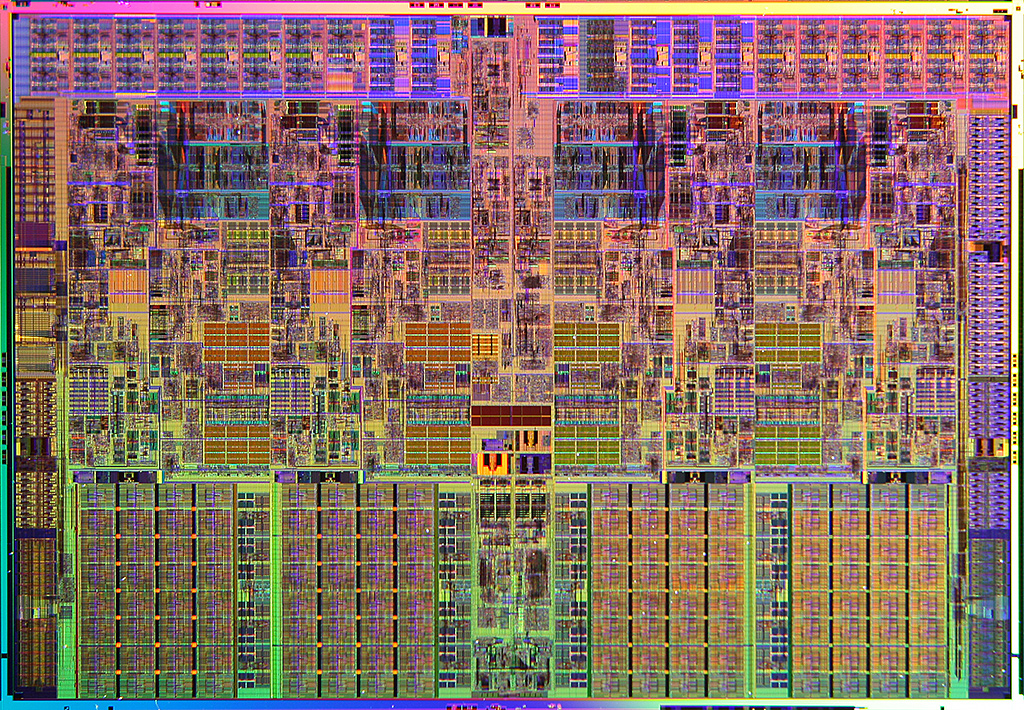
Full size and other cool images can be found here. That was 2008-2009 and they’ve only gotten smaller and more complex since. To show you why it’s important to have 100% chip coverage, here is the chip layout:

You don’t want one or more cores running hotter than others, it affects performance. You don’t want part of the cache to run hotter than the rest, it affects performance. You don’t… you get the idea. But it gets better…
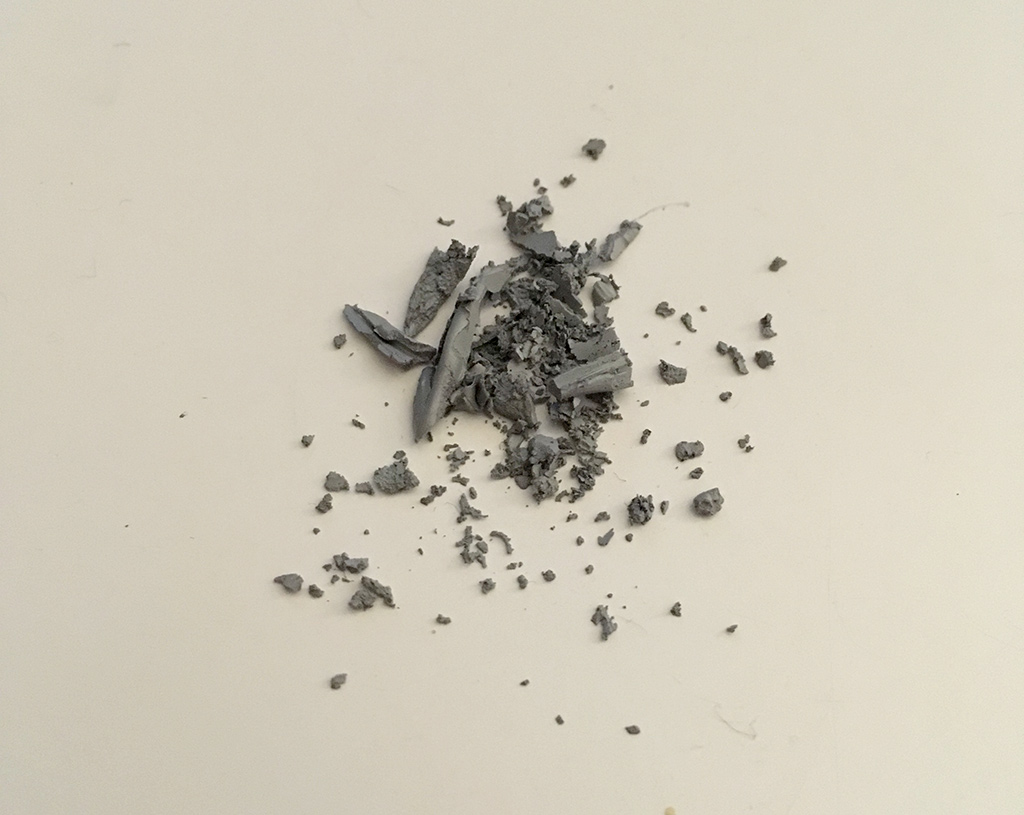
The viscosity of the paste Apple uses is pretty standard at the time it is applied but quickly turns into a dry mess. This is not all the time and I’m guessing it’s dependent on the temperatures the paste is exposed to but when thermal paste dries up, it becomes more of a barrier than a conductor. Here is some dried up paste scraped off the chip and heatsink from a 2011 MacBook Pro that had a board replacement in late 2013. This paste was barely 3 years old.
I’ll spare you the rest of my rant but yes, fresh thermal paste, regardless of how old or new your Mac is, a good idea. This is of course up to you, your comfort level and entirely at your own risk.
6. Take control of the cooling
You’re getting the heat away from the chip with the right thermal paste, the heatsink can do it’s job because it’s not clogged up by dust and you’re keeping it that way by regular cleaning your Mac and keeping it in a dust free environment. A great start but unfortunately there is one more thing preventing your Mac from cooling properly; the fans. More precisely, the way Apple programmed the fan behavior. This is the reason I started writing this post to begin with.
It takes a while for the fans on your Mac to kick in, allowing for higher than comfortable temperatures. My PSU reached 89C and the fan just idled, my CPU’s reached 65C and the fans just idled. I understand these temperatures are within safe limits but they do not help the component lifespan. Why wouldn’t Apple want you to get many more years out of your Mac by making it run just a bit cooler? Apart from wanting to sell you a new Mac as soon as they can, who knows.
The solution; take control of the fans yourself.
There are two ways to go about this:
1. Set a new idle speed and let the Mac handle the rest.
2. Set new fan speeds based on temperature readings.
 For years I used a free program called SMC FanControl to raise the default fan speeds in my Macs, often shaving off many degrees. With a few presets configured and easily available from the menu bar I could manage the fans just fine. I had a profile for video encoding that ramped up the intake, exhaust and booster fans, a profile for defragmenting and GPU intensive tasks that kicked the PCI fan into gear, etc. It’s still a utility I recommend daily and if you’re OK with the way Apple handles your fan behavior but you want just a bit more control and cooler running Mac, this utility is for you. It works on every Intel Mac I’ve ever tried to run this on and as mentioned, it’s free. Even if you only use it to raise the default idle speeds, you’ll likely add a few years to the lifespan of your Mac.
 I moved most of my Macs over to Temperature Gauge Pro (TGPro). It’s not free but well worth the investment. It gives you the ultimate control of your Mac’s cooling system and if configured properly, it’s set it and forget it. You decide how fast the fans spin based on preset temperature limits. Just experiment a little and before you know it the Mac is taking care of the cooling properly.
Apple is very proud of how thin, sleek and quiet their machines are. Unfortunately a silent Mac means a Mac that’s running way hotter than it should. It’s a choice, a little bit of noise to keep your Mac in good shape longer VS a silent Mac that will probably not last as long. Historically Apple will choose appearance over functionality every time.
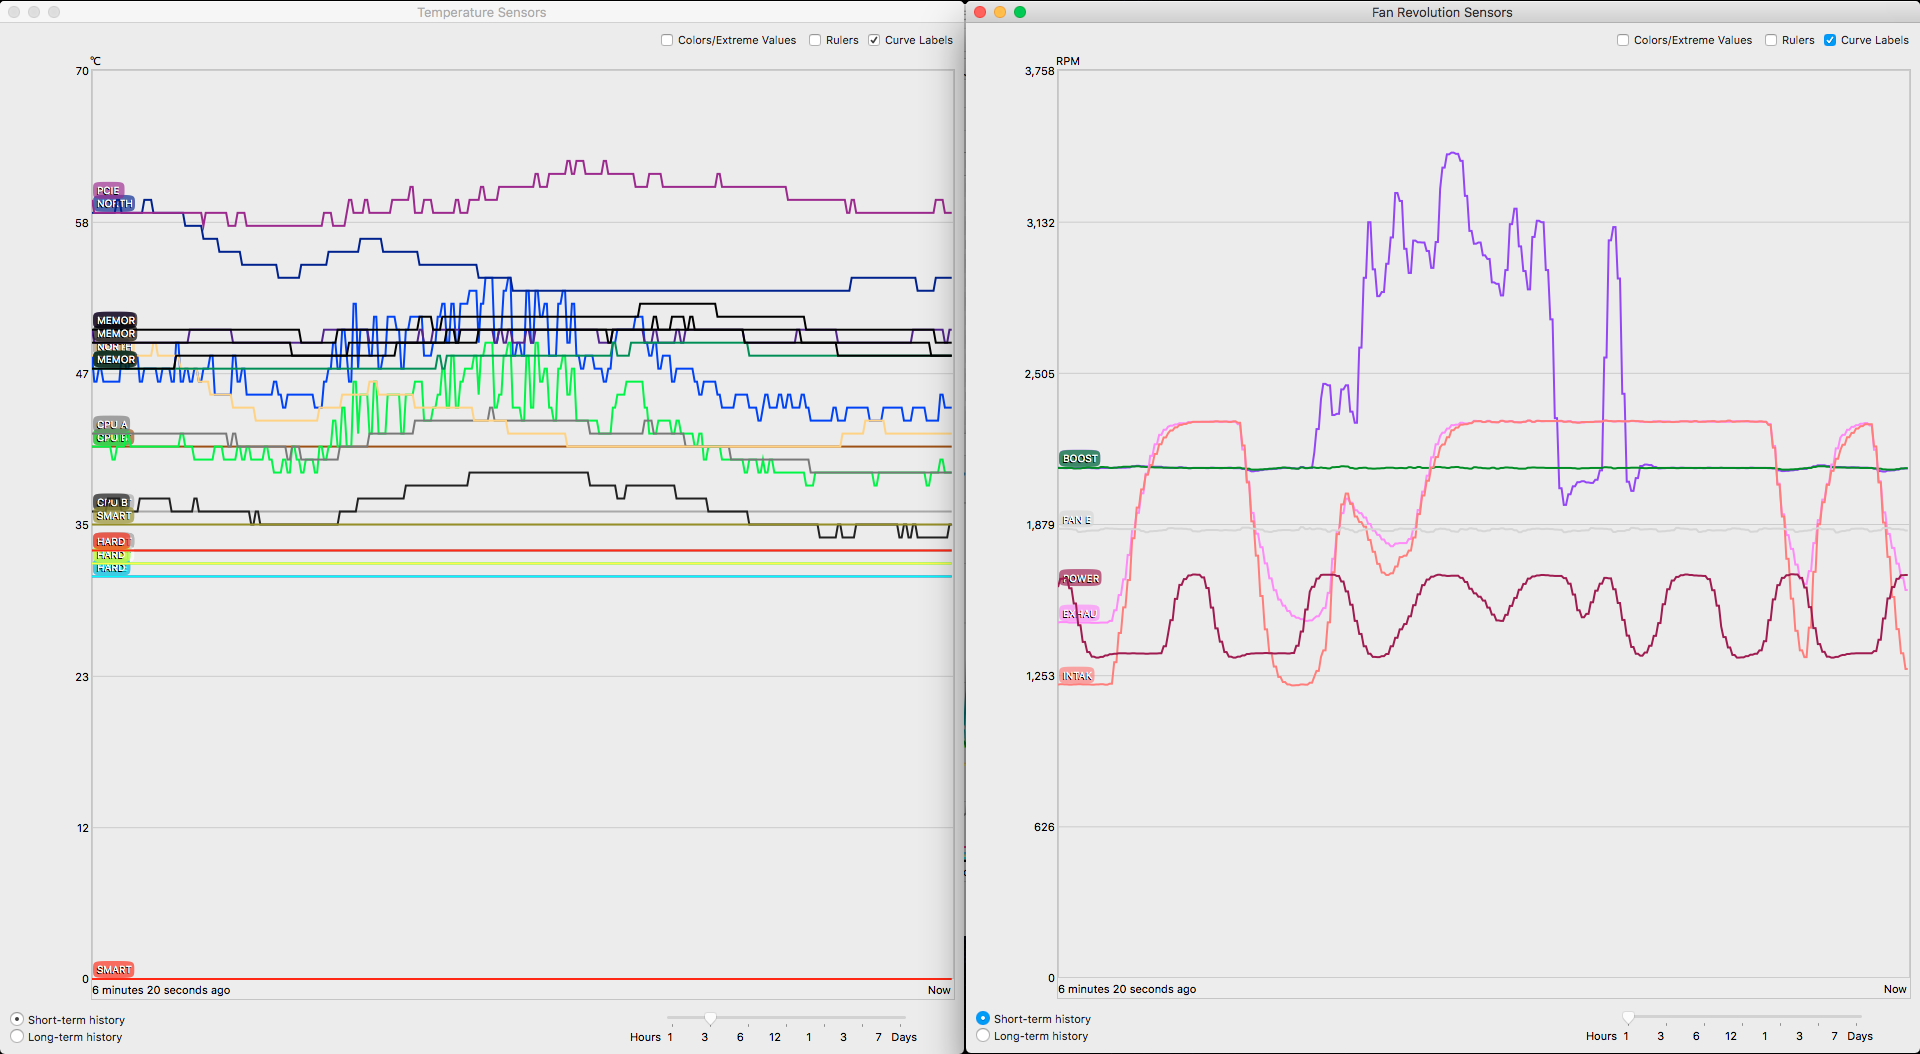
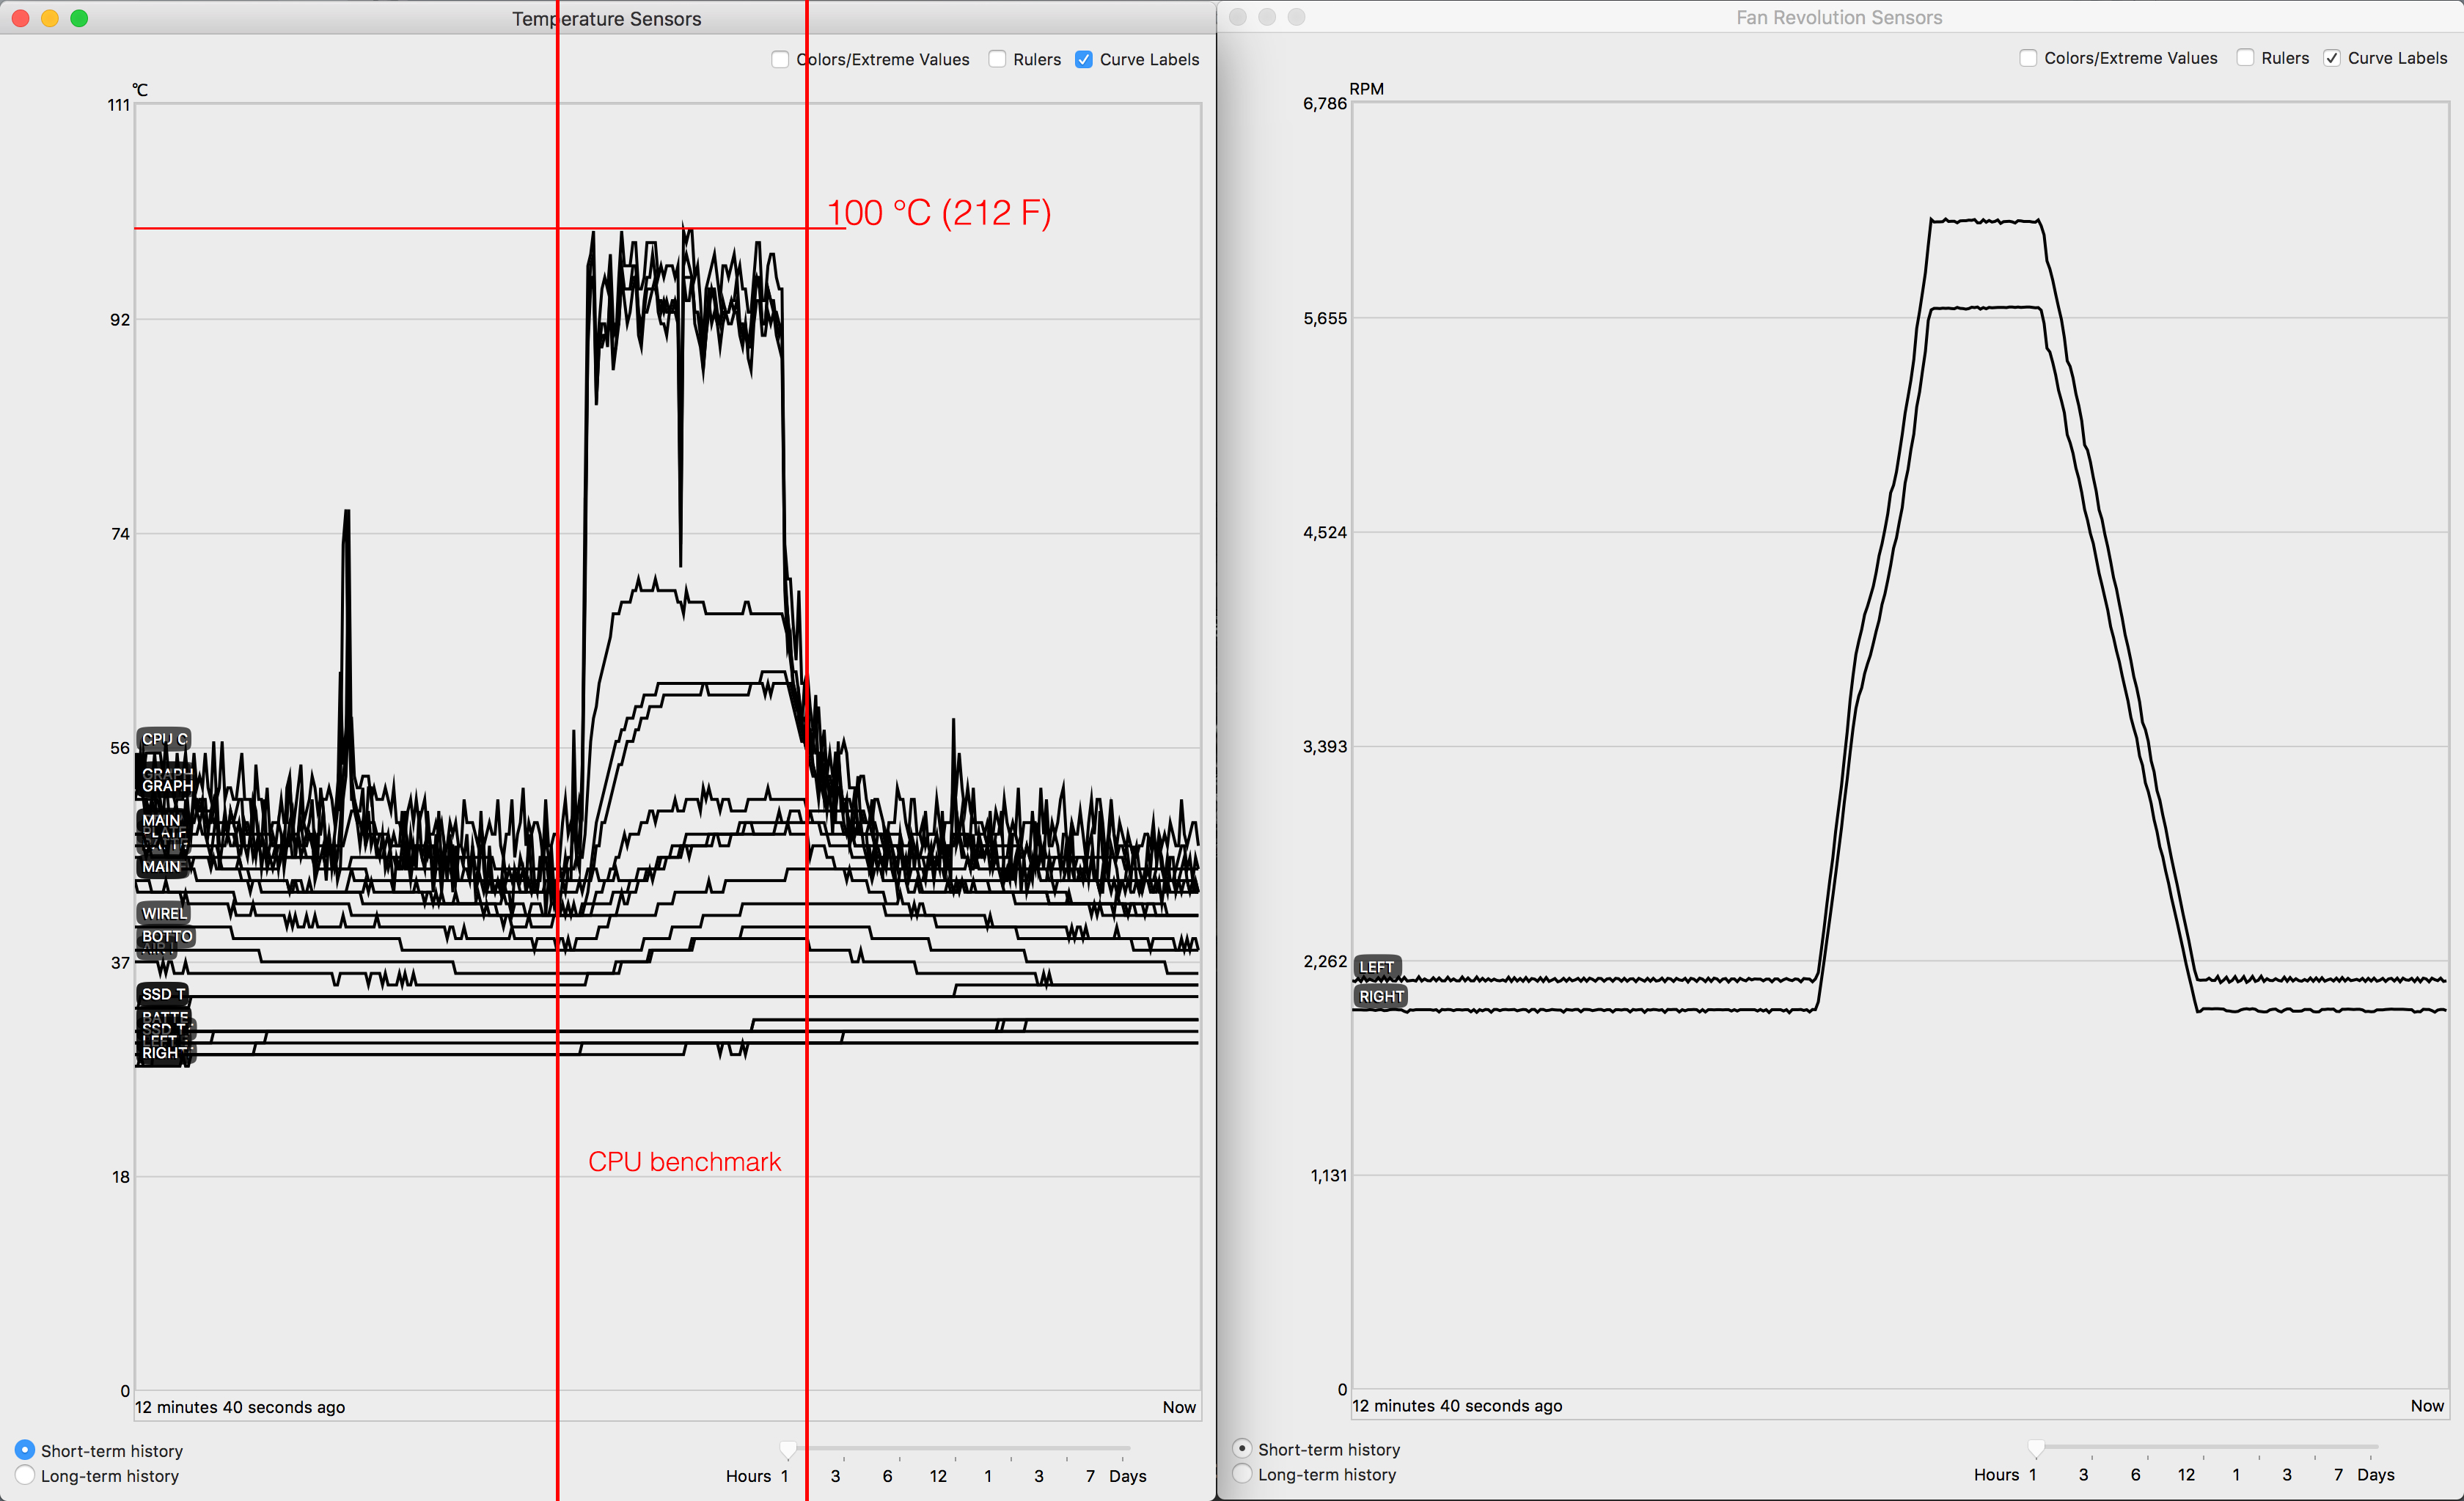
After an hour of letting Apple handle the fan behavior for me and components reaching temperatures far higher than I like to see, I activated TG Pro which I already had configured. Here’s what happened:
It noticed the internal temperatures were way over my preset limits so all the fans started spinning full speed. After a few minutes the components had cooled down to match my preset limits so the fans spun down and stayed at their new default RPM (which I also set). From that point on the fans will ramp up or spin down as needed to keep the maximum temperatures I set. I can walk away and know the Mac will take care of itself regardless of what’s going on. Here are the current temperatures:
PSU: 47C (-42C)
CPU’s: 46C (-19C)
GPU: 56C (-24C)
Northbridge: 54C (-22C)
Storage: 32-34C (~-16C)
RAM: 47C (-14C)
Ambient: 32-34C
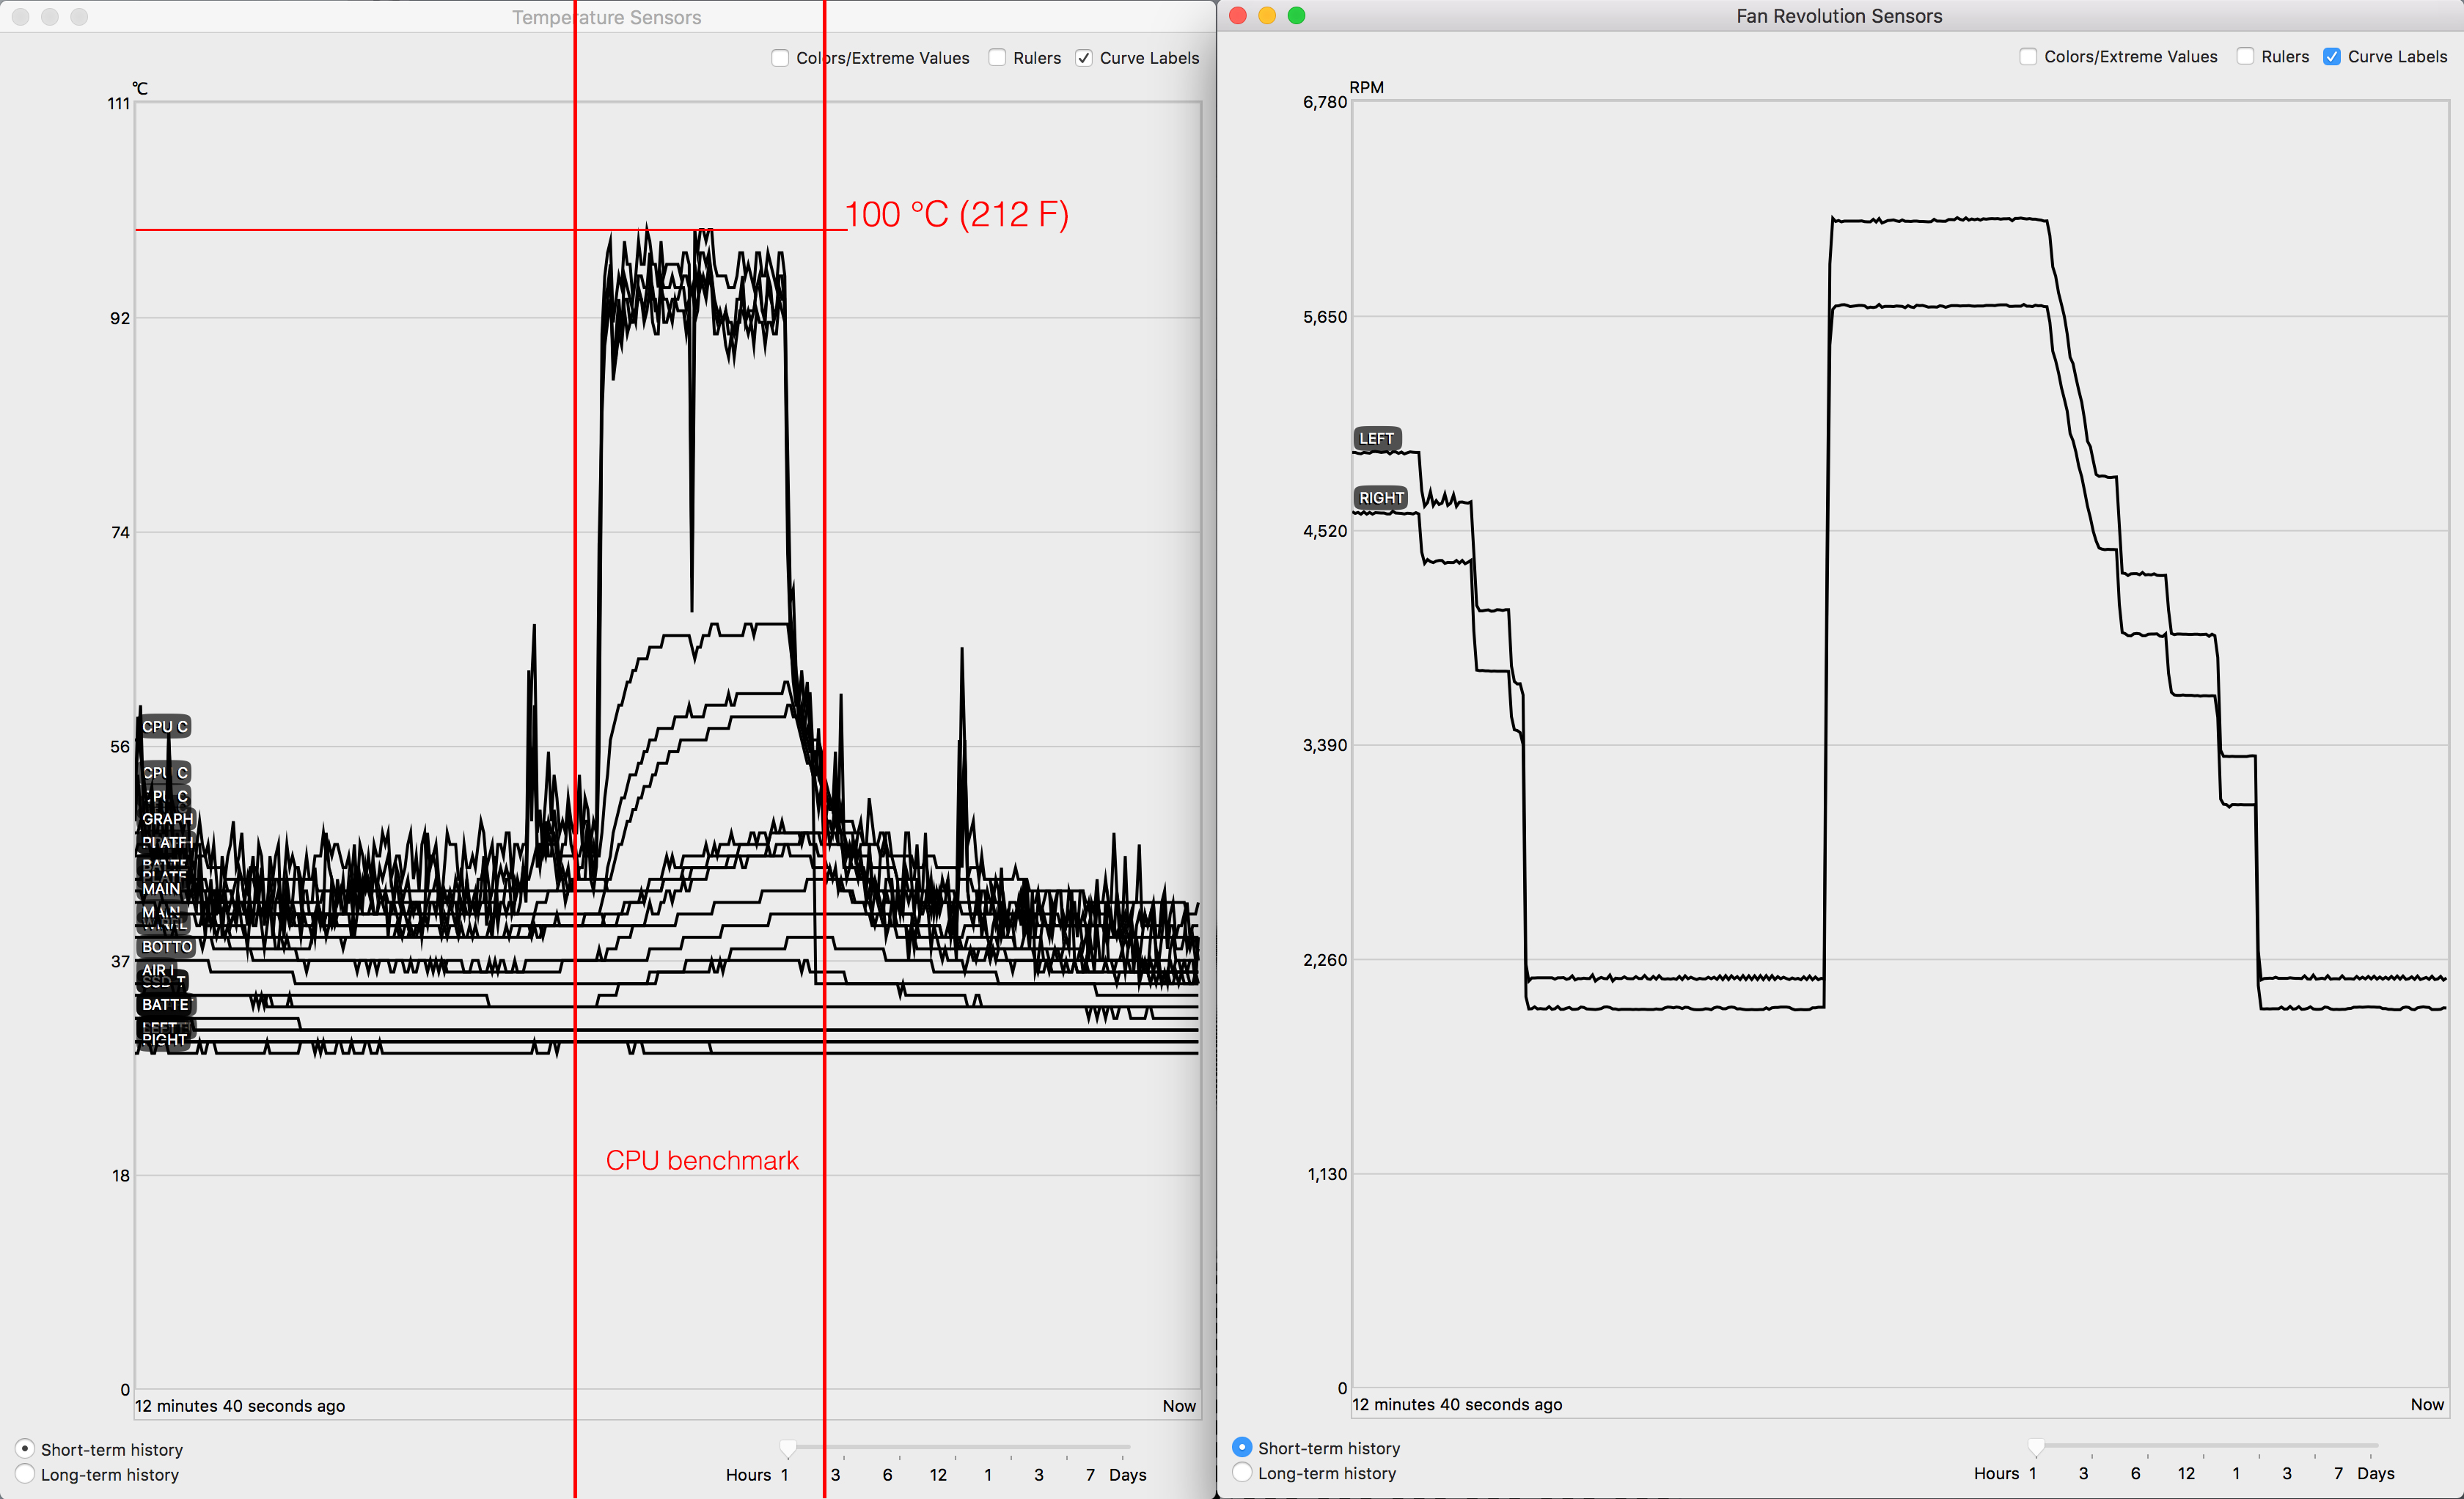
This is the result of a Geekbench benchmark test with TGPro keeping the temperatures in check:
It does a good job of keeping the temperatures as close to my preset limits as it can. Here is the same Geekbench test with TGPro off:
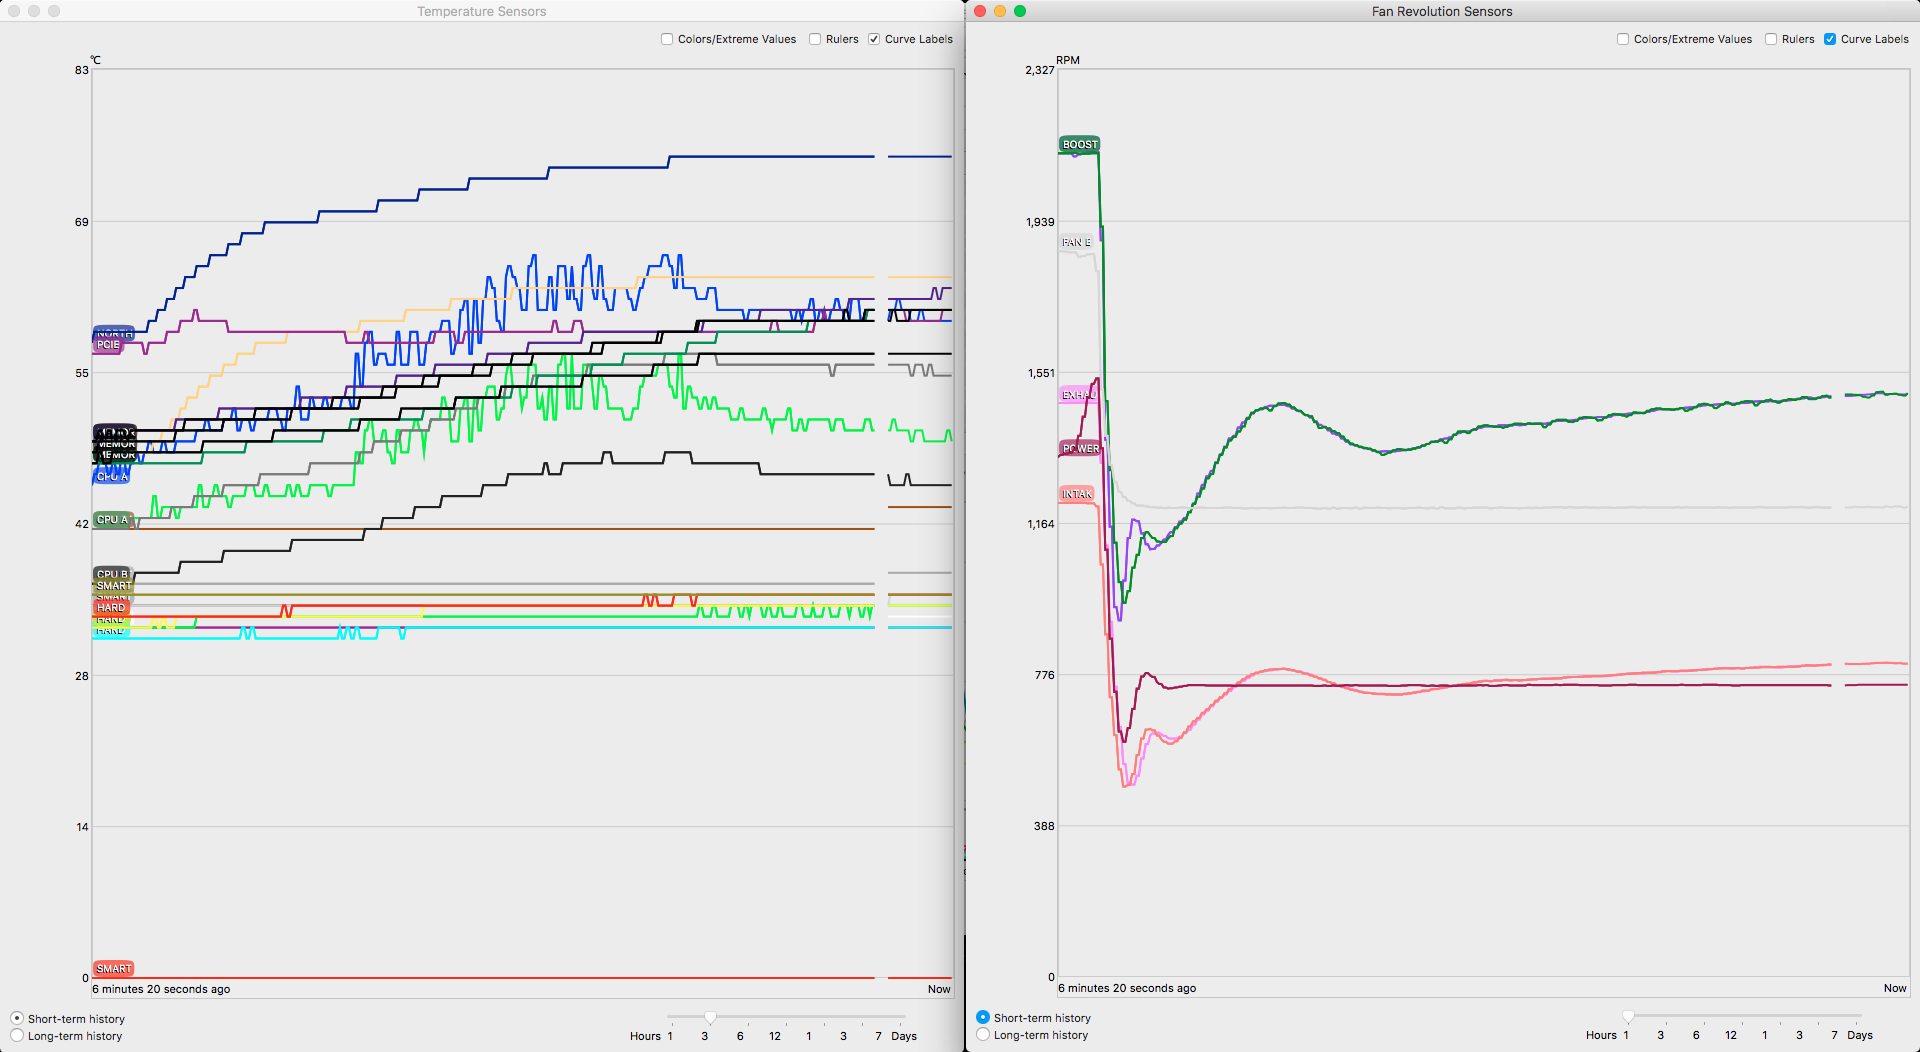
The hard drives stay at the same temperatures as they are not used in this short benchmark test, everything else goes right up. This test was done with starting temperatures much cooler than the system default because TGPro was running. These kind of tests when the system is already at temperatures between 61-89C will likely result in even higher temperatures.
Your system components will still heat up, even with adjusted fan behavior, as there is only so much that air can do. The purpose is to keep the temperature fluctuations to a minimum as materials expanding and contracting due to these fluctuations cause wear and tear. Of course you want to also keep them as cool as possible. TGPro does an excellent job. Unfortunately the design of most Macs do not work in your favor. A cMac Pro is easy enough to cool down, it’s design literally had one job; keeping the Mac cool enough. How about a 2015 Retina MacBook Pro? Thin, everything packed together, powerful i7 CPU and restricted airflow. I let the system idle with normal load (mail, itunes, a time machine backup), then I ran Cinebench and let the fans programming handle business. Then I let the Mac get back to normal temperatures and ran Cinebench again, this time with TGPro taking over. The results:
WOW! I think this is the first time I saw a CPU consistently hitting the 100C mark. That’s hotter than the 980W power supply in my Mac Pro 😮 TGPro’s menu bar readout actually turned orange and red throughout most of the testing. 100C is an insane temperature for a CPU and the fans took their time spinning up even though the CPU blasted from 50 to 100C within seconds. There is no way the fans in this Mac can do an adequate job keeping the CPU cool even if they spin up to their full speed immediately but let’s try it anyway.
The fans kicked in much faster but to no avail, the CPU simply gets too hot too fast and hits the 100C peak within seconds.
I tried testing with Cinebench and Geekbench for both the CPU and dedicated GPU, the CPU hit 100C every single time almost immediately and the GPU hit low to mid 90’s. I tested with default fan behavior, TG Pro fan behavior, fans on max RPM, taking the hardcover case off, raising it off the desk on a stand… made no difference. The only way I was able to run the tests without hitting the 100C mark was by rigging it in a way noone would ever use their MacBook Pro.
So I took off the bottom cover, exposing the Macs innards, put it up on a stand, maxed out both internal fans, placed one additional fan at an angle underneath the stand and one directly pointed at the keyboard. I let it sit for about 15 minutes idling getting as cool as it could possibly be (and it got very cool). I ran the tests again and the CPU got up to 90C a few times but on average hovered around 80C, if I ran the test twice in a row though it immediately shot back up to 100C. Even with that insane amount of cooling the CPU reached it’s limit!
I looked up the specs for the Intel Core i7-4980HQ 2.8GHz and it’s maximum allowed temperature is 100C. When 100C is reached the CPU immediately throttles it’s speed to cool off. As often as it hits that temperature limit during CPU intensive tasks (benchmarks, video editing, encoding etc.) that’s a lot of throttling to keep itself from burning up.
Surely this throttling must be measurable? Repeating all of the above ways of testing, I found that on it’s default settings, the highest Geekbench score I got was 15305 with most tests dipping below 15000 slightly. The cooler I got the Mac to run the higher the test scores became until I finally ended up with a 16040 score using the ridiculous cooling method described above, consistently. Allowing the Mac to cool off between each test of course. A 735 point difference equals about the power of a 1.6 GHz Power Mac G5, which is ironic as the rMBP is just as bad at staying cool as the G5. That’s quite a bit of horsepower lost just because the Retina MacBook Pro design is unable to keep the CPU temperature within acceptable limits. For professionals that push these Retina Macs to their limits every day, or even regular users that need full power once in a while, they actually get less than what they paid for!
I had a few people with rMBP’s from 2014-2016 run the same tests and monitor the temperatures. Each and every one reached 100C almost right away as testing begun.
Moving on.
So on a Retina MacBook Pro any kind of fan control is pretty much useless. If you want you can use either app to raise the default fan speeds and make the Mac run slightly cooler but if anything happens that demands some juice from the CPU or GPU, fan control apps won’t be able to help you. Luckily for cMac Pro’s and iMacs, fan control utilities actually work very well. Whether fan control can help you on your MacBook Air, MacBook or any particular Mac really can only be known if you test it. As mentioned though fan control is just a part of the puzzle. All of the above mentioned points play a part.
I have yet to see a stress test or benchmark break a Mac but keep in mind it can happen so make sure your data is backed up before you embark on this journey. Everything from taking apart your Mac to testing it is at your own risk.
Did you like this content? |
|