My road to logic board repairs
I’ve been supporting Macs since the late 90’s in school. After school I moved on to work for Apple service providers, resellers, consultants and finally 6 years in an Apple Store as a technician. After Apple I started my own consulting company in 2015 and have been enjoying running my own business since. I’m 34 years old at the time of writing and have always been proud to call myself an Apple technician, repairing hardware, troubleshooting software and resolving even the most puzzling issues. It took me 18 years to figure out… hardware wise I never actually repaired anything. This realization came somewhere around Christmas 2016 when one of my son’s toys broke and I opened it up to see if I could fix it. A wire came loose and using some tape I put it back in place, making the toy work again. I didn’t replace the part, I didn’t replace the toy, I fixed it. (tape was replaced with a solid solder joint last week 😉 )
This has to be possible with Macs as well. Not replacing the whole board but replacing a transistor, wire or fuse. Why not, right?
I’d been telling people for years that to fix this particular issue, you need a new *name the part*. Your 2010 MacBook Pro kernel panics or shuts off when the dedicated NVidia chip activates? Sorry, that’ll be $700 for a new logic board. Graphics card failed in your 2007/2008 MacBook Pro? Sorry, that’ll be $750 for a new logic board. You spilled something on your device and now it won’t turn on? Sorry, might as well buy a new one as having this fixed will be too expensive. No backlight on your 2013 MacBook Air? You get the idea.
Hundreds, probably thousands of people either scrapped their device or paid hundreds of dollars to have it fixed based on what I told them. After just a little research I found out some of the common problems can be fixed for under $10. Yes, less than ten dollars. Reading forums, blogs and watching YouTube videos a whole new world was opened up to me. My mind was blown and I got angry. That anger grew and turned into shame. I was never trained to offer logic board level repair, I was trained to replace parts. A monkey can replace parts, a technician repairs those parts. Not having the right training and getting certified as a technician without actually being a technician… I put that on my past employers. Not asking questions and doing research… that’s on me. I could have saved all the people I mentioned earlier probably hundreds of thousands of dollars.
I’m angry at the industry. Angry at myself for not waking up sooner. I’m ashamed of how much money that cost others.
As I was researching logic board repair and soaking up all the knowledge I could find, someone contacted me. “Do you do logic board level repairs? I have a few Macs you can work on if you are interested”. After doing a post about logic board repair on Facebook, someone else offered to send their Mac so I could try to fix it. Also at the same time my wife’s 2009 MacBook pro started experiencing issues switching between graphics chips. Coincidence? Nah, too much logic board repair stuff coming at me right now, I’m going for it!
“Sure, send me your busted Macs, I’ll take a stab at it”
“If you’re brave enough to send your Mac to me, knowing I have zero experience, I’ll fix it for just the cost of the chip”
“Honey, I’m going to fix this Mac!”
And just like that, Macs were coming my way. I had a soldering iron with a tip that was many times too big (and had never been used as I never soldered anything in my life) and good intentions, I could get this done. That gung-ho mindset lasted all of 2 hours. If I was going to do this, I had to give it a proper effort and not half ass it. So I went to my forums and sites to see what some of the recommended and must have tools were.
Hot air rework station: $570
Soldering station: $240
Microscope: $500
Fume extractor: $570
Ultrasonic cleaner: $870
Cleaning solution for that cleaner: $100
Flux: $16
Solder, wick, different soldering iron tips, tip cleaner, tip tinner, jumper wire….
Looking at over 3 grand for all the right and recommended tools and supplies.
I want to give this a proper shot but last time I farted, no $100 bills came flying out. So, time to find alternatives.
An ultrasonic cleaner would be nice but using a $50 jewelry cleaner would really mess up any electronics I put in it. So for now I’ll just say no to any kind of liquid damage repairs and the few things that do require cleaning will be done old school; with alcohol and a toothbrush. The microscope I already have will have to be enough so scratch that off the list. Found a multi meter in a drawer too, let’s hope it’s good enough. After a while I came up with the following list:
YIHUA 2in1 878ad Soldering Iron Rework Station: $55 (link)
MG Chemicals No Clean Flux: $10 (link)
OMorc Desoldering Wick: $7 (link)
Solder: $10 (link)
1000l Adjustable Solder Smoke Absorber: $30 (link)
Cj’S Flux Remover: $8 (link)
Heat Insulation Silicone Repair Mat: $7 (link)
I felt this would be enough to at least allow me to give this a proper shot. $125 invested in what could become a new hobby, service offering for my business or both. Yes, I feel better now. During the next week, one by one the ordered supplies and the Macs started arriving at the house. I’ll cover them in a bit more detail.
YIHUA 2in1 878ad Soldering Iron Rework Station
When it comes to soldering stations and hot air rework stations, Hakko and Weller are the brands that are recommended. They are the best and because everyone uses it, so should I. Not feeling like blowing over $800 on these tools, I found an alternative. The YIHUA has both the hot air and soldering in a single station. It’s a Hakko brand knock-off but at $55 apparently a really nice one. The reviews I read gave this thing a lot of credit and it came with a tip included.
MG Chemicals No Clean Flux
On the forums I read, the recommended brand for flux is Amtech. It’s fantastic, it’s amazing and makes you solder like a pro even if you suck. Amtech is also $7-$15 more, depending on the source, so I went with MG Chemicals instead. The reviews were alright and flux is flux so why bother paying more for the same stuff.
Desoldering wick
Wicking solder is amazing. I never knew it was a thing, brilliant. It’s a braided copper wire with flux on it, just hold it up against the solder you want to remove, heat it up with your iron and slllluuurrrppp, solder gets sucked up into the wick, freaking genius. I knew I had to have this as it looked to make my life a hell of a lot easier.
Solder
The solder I had is a very thick one, way too thick for the delicate work I’d be doing. The solder I got was nice and thin.
Fume extractor
Or smoke absorber, whatever you call it, it sucks the toxic fumes away from you and pushes it through a carbon filter. I have a toddler running around so this was a no-brainer. Positive reviews and over $500 cheaper than the recommended brand/model. Rather than having vacuum cleaner like hoses coming out of the filter to position wherever you need them, this is an all in one unit that sits on top of the desk right where you need it. A fan with a filter in front of it, nothing fancy.
Flux remover
Flux leaves behind a sticky, gross mess. Not a problem if you have a $870 ultrasonic cleaner but since I don’t have one, this will have to do. It dissolves the flux that’s left behind on the board which in turn will be cleaned off with some alcohol.
Heat insulation mat
For obvious reasons I don’t want to mess up my antistatic repair mat or the desk under it. This slab of silicone is cheap and gets the job done.
Everything else
Q-tips and 91% Isopropyl alcohol were picked up at the local grocery store. Dealing with logic boards you’ll often have to remove the heat sink so also make sure you have some thermal paste and cleaning solution handy.
I was all set! And so I opened the 2010 MacBook Pro that just arrived and got to work. An hour later I had sitting in front of me a fully functioning Mac. All it needed was a $5 chip. I actually repaired something Apple back in the day charged $700 for to repair! (these days a board for that Mac sells for $450). The feeling was amazing and I was instantly hooked. This was my redemption, I could fix Macs at a fraction of the cost saving people hundreds of dollars going forward!
As great as I felt (and still feel), the shortcomings of the tools and supplies I got became very obvious after just one repair. Here’s a list of my findings/mistakes:
• The rework station got the job done. I feel it’s not calibrated to perfection but simply turning up the dial fixes that. Both the hot air and soldering iron heat up quick and allow me to do what needs to be done.
• The MG Chemicals flux is useless. It evaporated before I even got close to getting any work done. The recommended Amtech flux I should have gotten stays around for a while so you can actually do the soldering properly. In my attempt to save $7, I wasted $10. Lesson learned.
• The fume extractor works, kind of, if it’s just a few inches away from the fume producing action. I’m talking 5 inches or less, right on top of it is where it needs to be to somewhat work. The fan is not powerful enough to capture what the hot air gun is blowing off the board. The hot air stream is much more powerful than the fan in the fume extractor so a lot of the smoke and smell is blown past the filter completely. Also, by having to have it SO close to the action, you end up blocking a lot of the light you need to see what the hell you’re doing. I tried to MacGyver some solutions together to funnel the air into a hose-like system, no go. This fume extractor might be OK for just soldering but once a hot air gun becomes involved, this thing is useless.
• The heat insulation mat works really well but DO NOT MOVE IT if you decide to get the one I linked to. Even the slightest move of the mat causes an incredible amount of static to build up in the silicone. Sparks fly, crackle and pops are heard and are all focused to the board laying on top of it. When this mat is moved (re positioned/slid or picked up), make sure there is nothing on it. Doesn’t matter if it’s on a grounded mat, if you’re grounded or even if the silicone mat itself is grounded with an alligator clip, sparks will fly. Knowing this, I just don’t move the mat and am fine with it. When it comes to the heat insulation this mat is 100% as advertised and works great.
• After using the soldering iron on a board to practice on and to fix the above mentioned Mac, the tip is almost completely destroyed. By not properly cleaning and tinning the tip I ruined it in less than a day to the point it barely works. Tip tinner is a must have, as is a tip cleaner. Rubbing the tip on a wet sponge (comes with the rework station) doesn’t clean the tip and actually fractures the metal due to the rapid cooling off. A chisel tip is also much better when using the wick.

• The tip that came with the rework station is actually too small. A chisel type tip is needed, or preferably a slightly curved tip.
• The small USB microscope I have is completely useless for this kind of work. I thought I could get by but I just end up using it for the built in LED lights as my fume extractor is blocking out most of the overhead light I have. The most important feature of a microscope for this kind of work, I’d say even more important than the actual magnification, is the working distance. You want a microscope that can give you 10x magnification (or however much you want) but from a height where it’s not in your way. Leaving you with enough space for your hands and tools to work in whatever angle you need.
Some even use one of these which is probably still better than the one I use.
• Wicking solder is awesome.
With this first hand, albeit limited, experience, here are the tools and supplies I should have gotten the first time around:
YIHUA 2in1 878ad Soldering Iron Rework Station: $55 (link)
Amtech solder flux: $18 (link)
OMorc Desoldering Wick: $7 (link)
Solder: $10 (link)
Tip tinner: $8 (link)
Solder tip cleaning wire: $9 (link)
Solering tip: $10 (link)
Cj’S Flux Remover: $8 (link)
Heat Insulation Silicone Repair Mat: $7 (link)
Microscope: $190 (link)
For a total of just over $320 this list will have you MUCH better prepared and able. The microscope is nothing too fancy but it is recommended by the pros as a cheap alternative to the $500+ ones. You’ll notice the list does not have a fume extractor on it, this is because I haven’t found a good replacement yet. Going from a desk stand model to a good unit you almost instantly add a few hundred dollars.
The Amtech flux arrived shortly before I started typing this up and it is indeed amazing stuff. It made me solder, even with the destroyed tip, better! Nice smooth joints and wicking with this flux involved goes a lot smoother too. The downside; smoke, lots of it. The MG Chemicals flux produced some smoke as it evaporated but not much more than the smoke you’d get from soldering. The Amtech flux produces a LOT of smoke in comparison. This makes it even more obvious how the current fume extractor is not up to the task. as smoke goes everywhere.
I’m still waiting on the rest of the tools (the microscope is something I’ll likely purchase in a month or so) and will post a follow-up piece when they arrive and have been used/tested. I just wanted to get this post out in case it can be of help to others that want to get started on board repairs.
Schematics and board views
Without board schematics and board view files, you’re dead in the water. You need the schematics to tell you how everything is connected, what the voltages are at any given point and what the values are of the components on the board. These schematics have to be found online, sometimes in deep dark corners of the internet as Apple does not release them to the public. These things are typically leaked from the factories in China etc. If you’re lucky you can find some for free, other times you’ll have to pay for the schematic you want and don’t expect a smooth eBay or Amazon process. No buyer protection, no assurances… you pay the asked amount and hope for the best. I’ve seen several sites and blogs get in trouble for pointing readers to direct sources for these documents or for explaining in details how to search for them. I just hope you’re reading this post carefully and I’m sure you can figure it out 😉 Anywho, here’s an example of such a schematic, just one page in a 100 page document. This is for the 820-2850 logic board which is a 15-inch Mid 2010 MacBook Pro. Famous for kernel panicking or shutting off when switching from the Intel discrete graphics chip to the dedicated NVidia graphics chip. Turns out there is a capacitor that’s responsible for this problem which can fairly easily be replaced with a better capacitor for $5. The capacitor is labelled C9560 in the schematic.
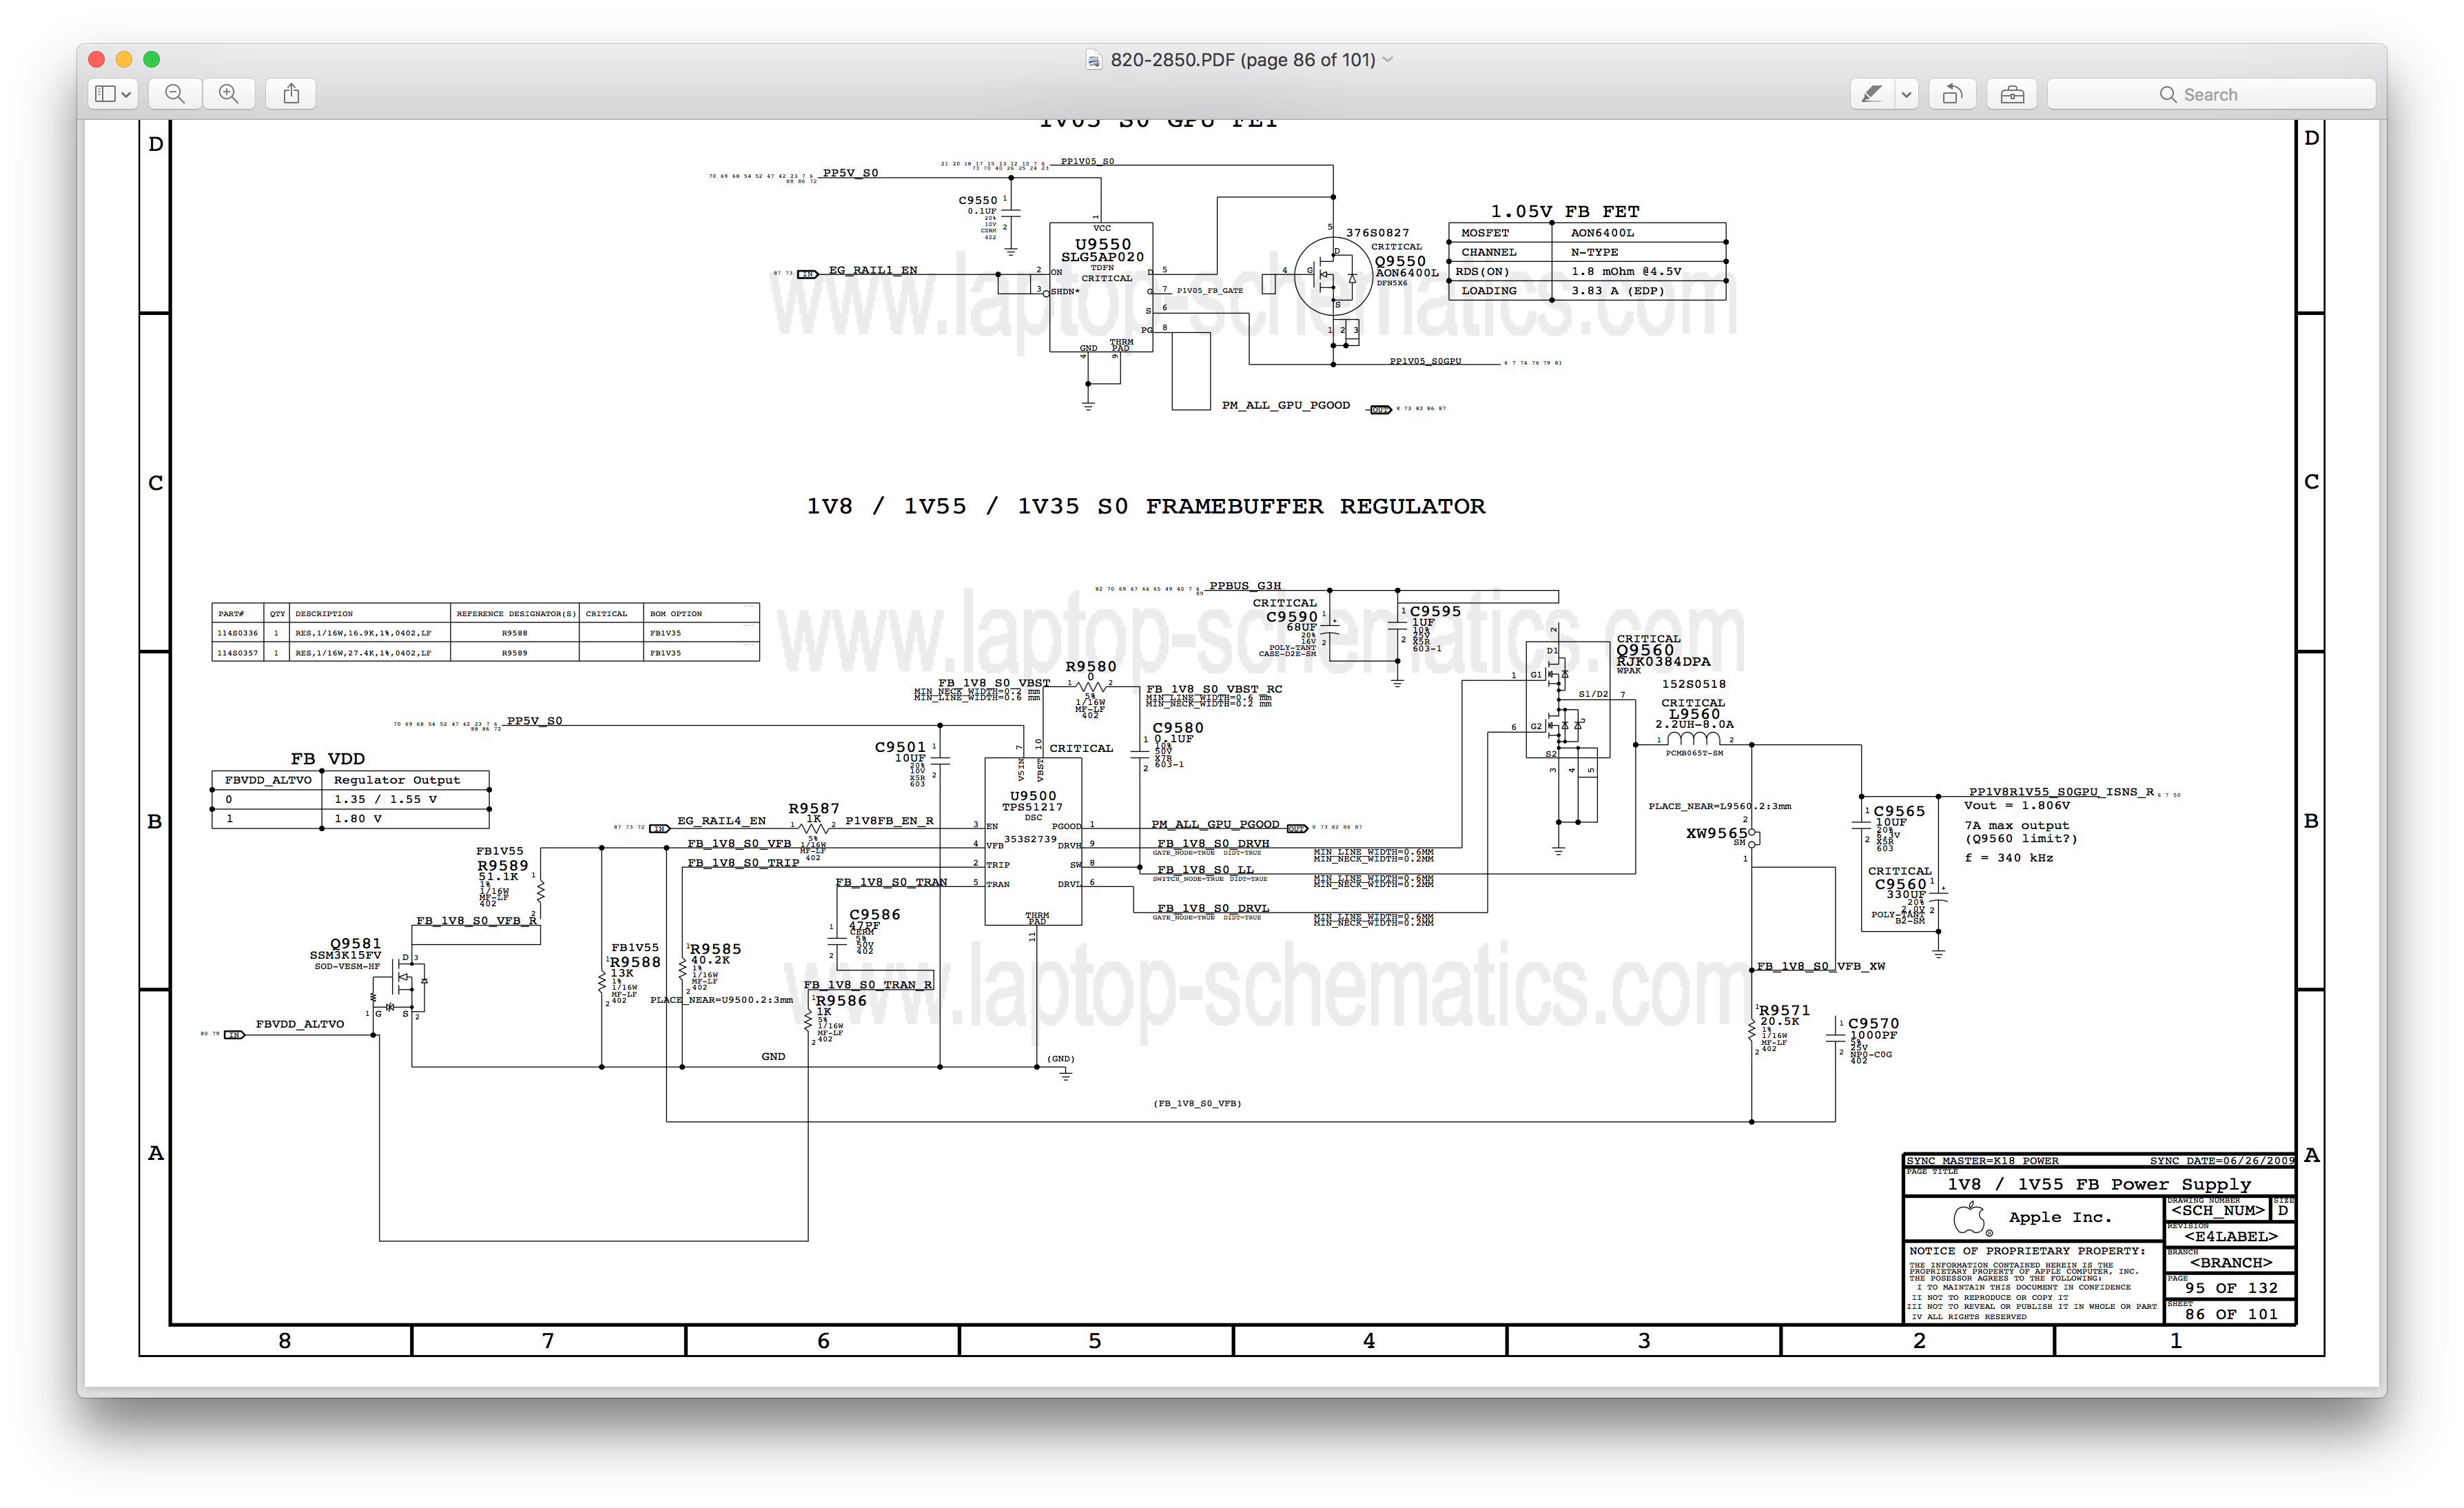
I know the watermark is annoying…………. but you should still be able to see all the relevant information.
Knowing where to look for the component that may be at fault in the schematic is a matter of understanding what makes up a schematic, what the individual components do, smart process of elimination etc. You’ll really want to check out these videos (playlist) to get a basic understanding if you don’t have it already.
So you’re after C9560. Knowing where it’s located on the board is of course very important as well. Checking the whole board with a microscope for the tiny printed (not always) numbers can take hours so that’s not an ideal way to go about this. What if there was a way to just do a search and you’d instantly see a layout of the board and where that exact component is located? Wouldn’t that be awesome? Hell yeah it’s awesome and the software is called OpenBoardView. It’s simply amazing and if you got your schematic(s) from a good source, a boardview file will be included with them.
The boardview file looks like this and a simple search shows you exactly where the component you’re looking for is located.
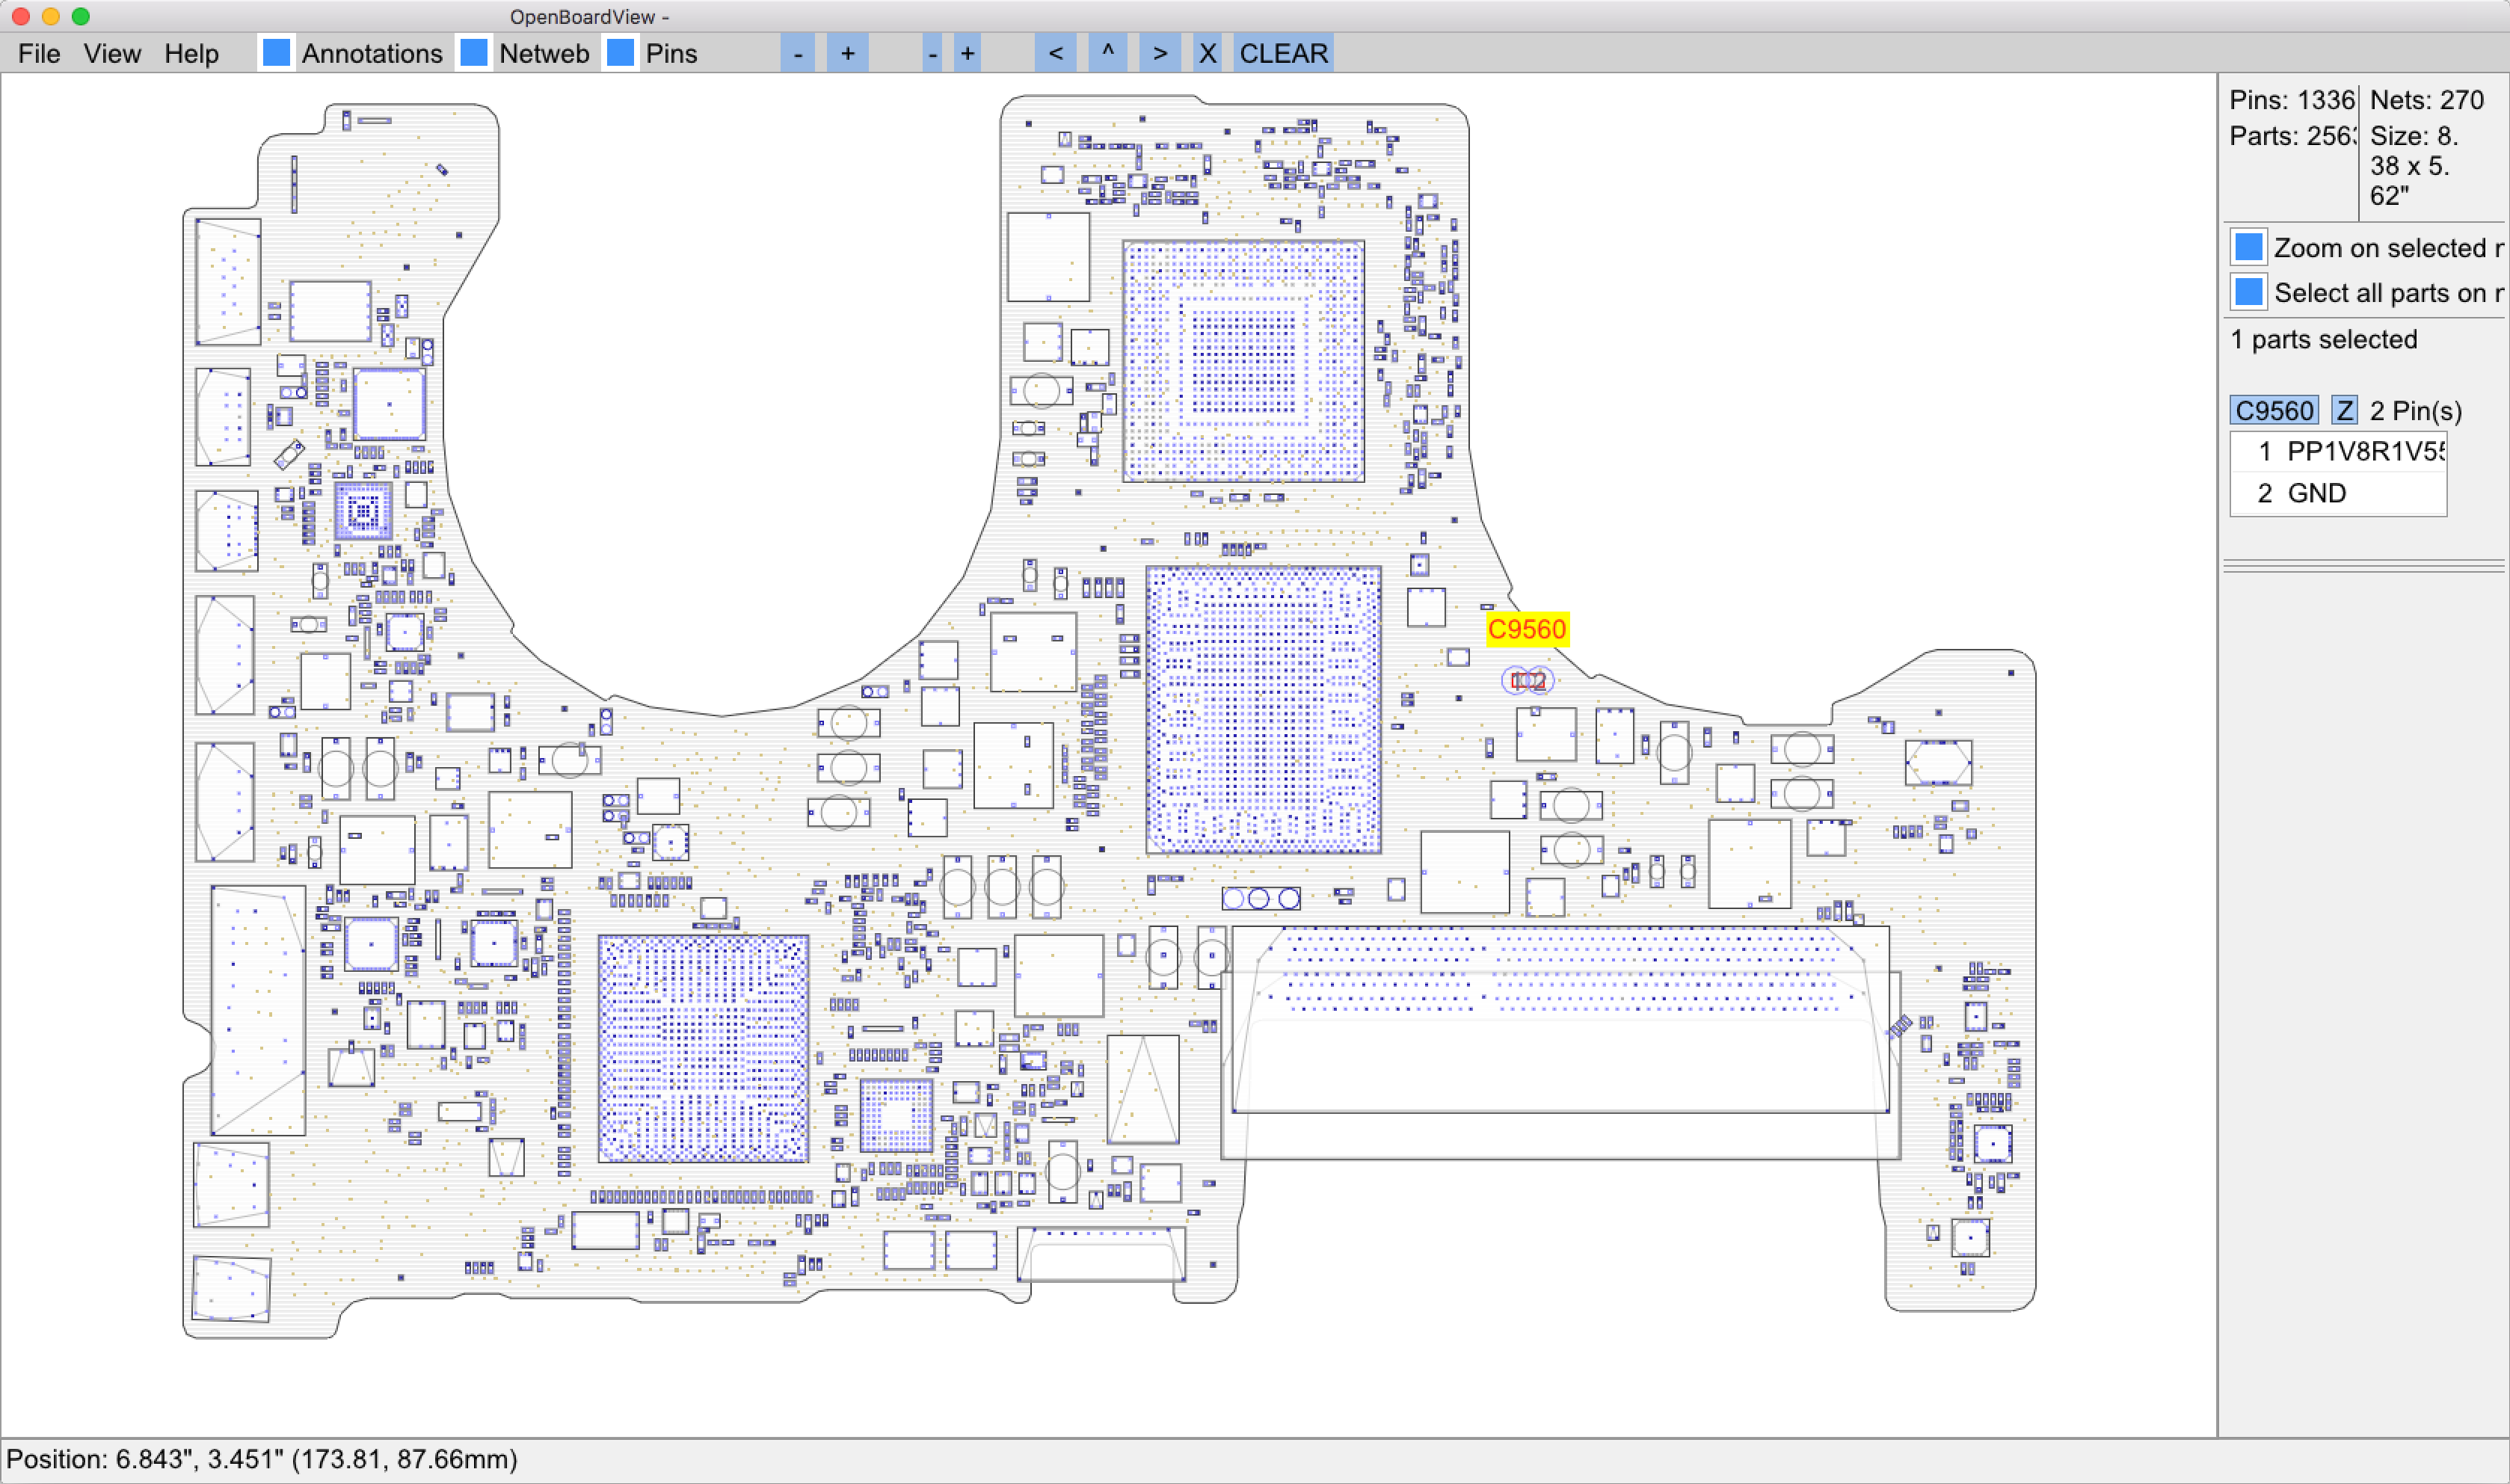
It’s so cool 🙂
Of course you can zoom in and see in more detail where it’s located, the pin numbers etc.
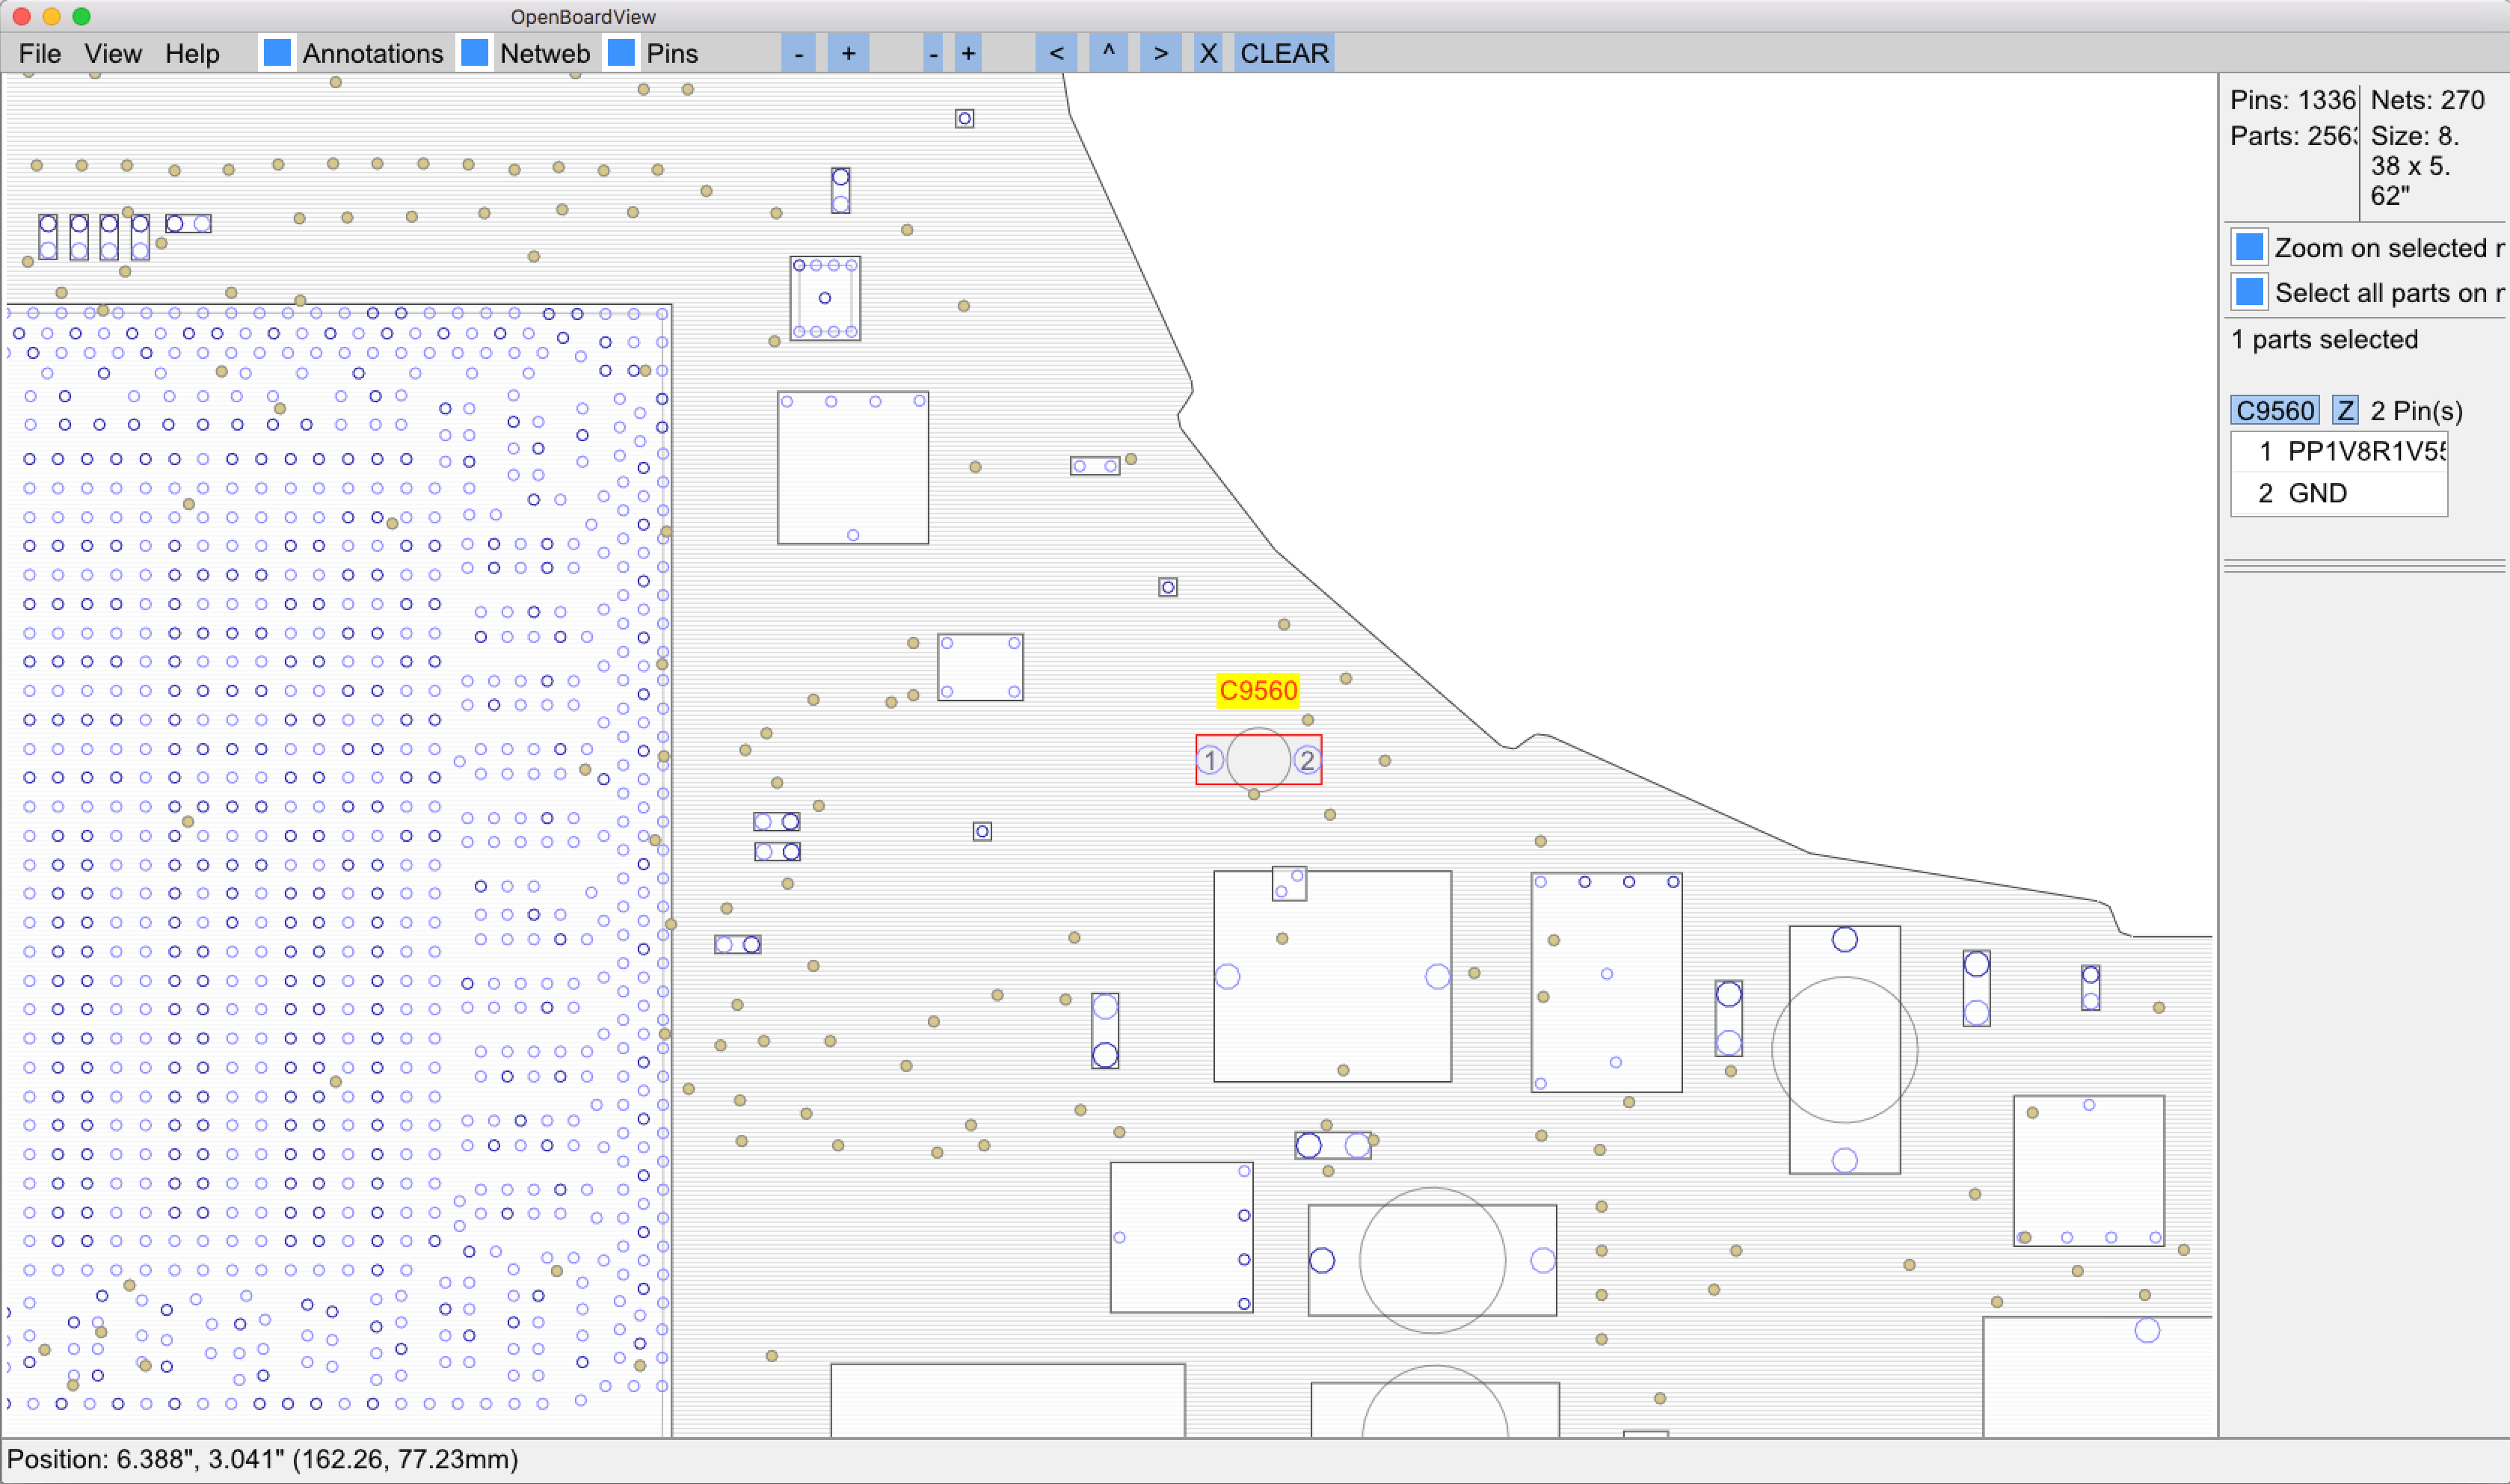
It gets better, click on any pin and it’ll show you what that specific pin connects to on the board. Super helpful if you’re trying to track down a point of failure in a circuit.
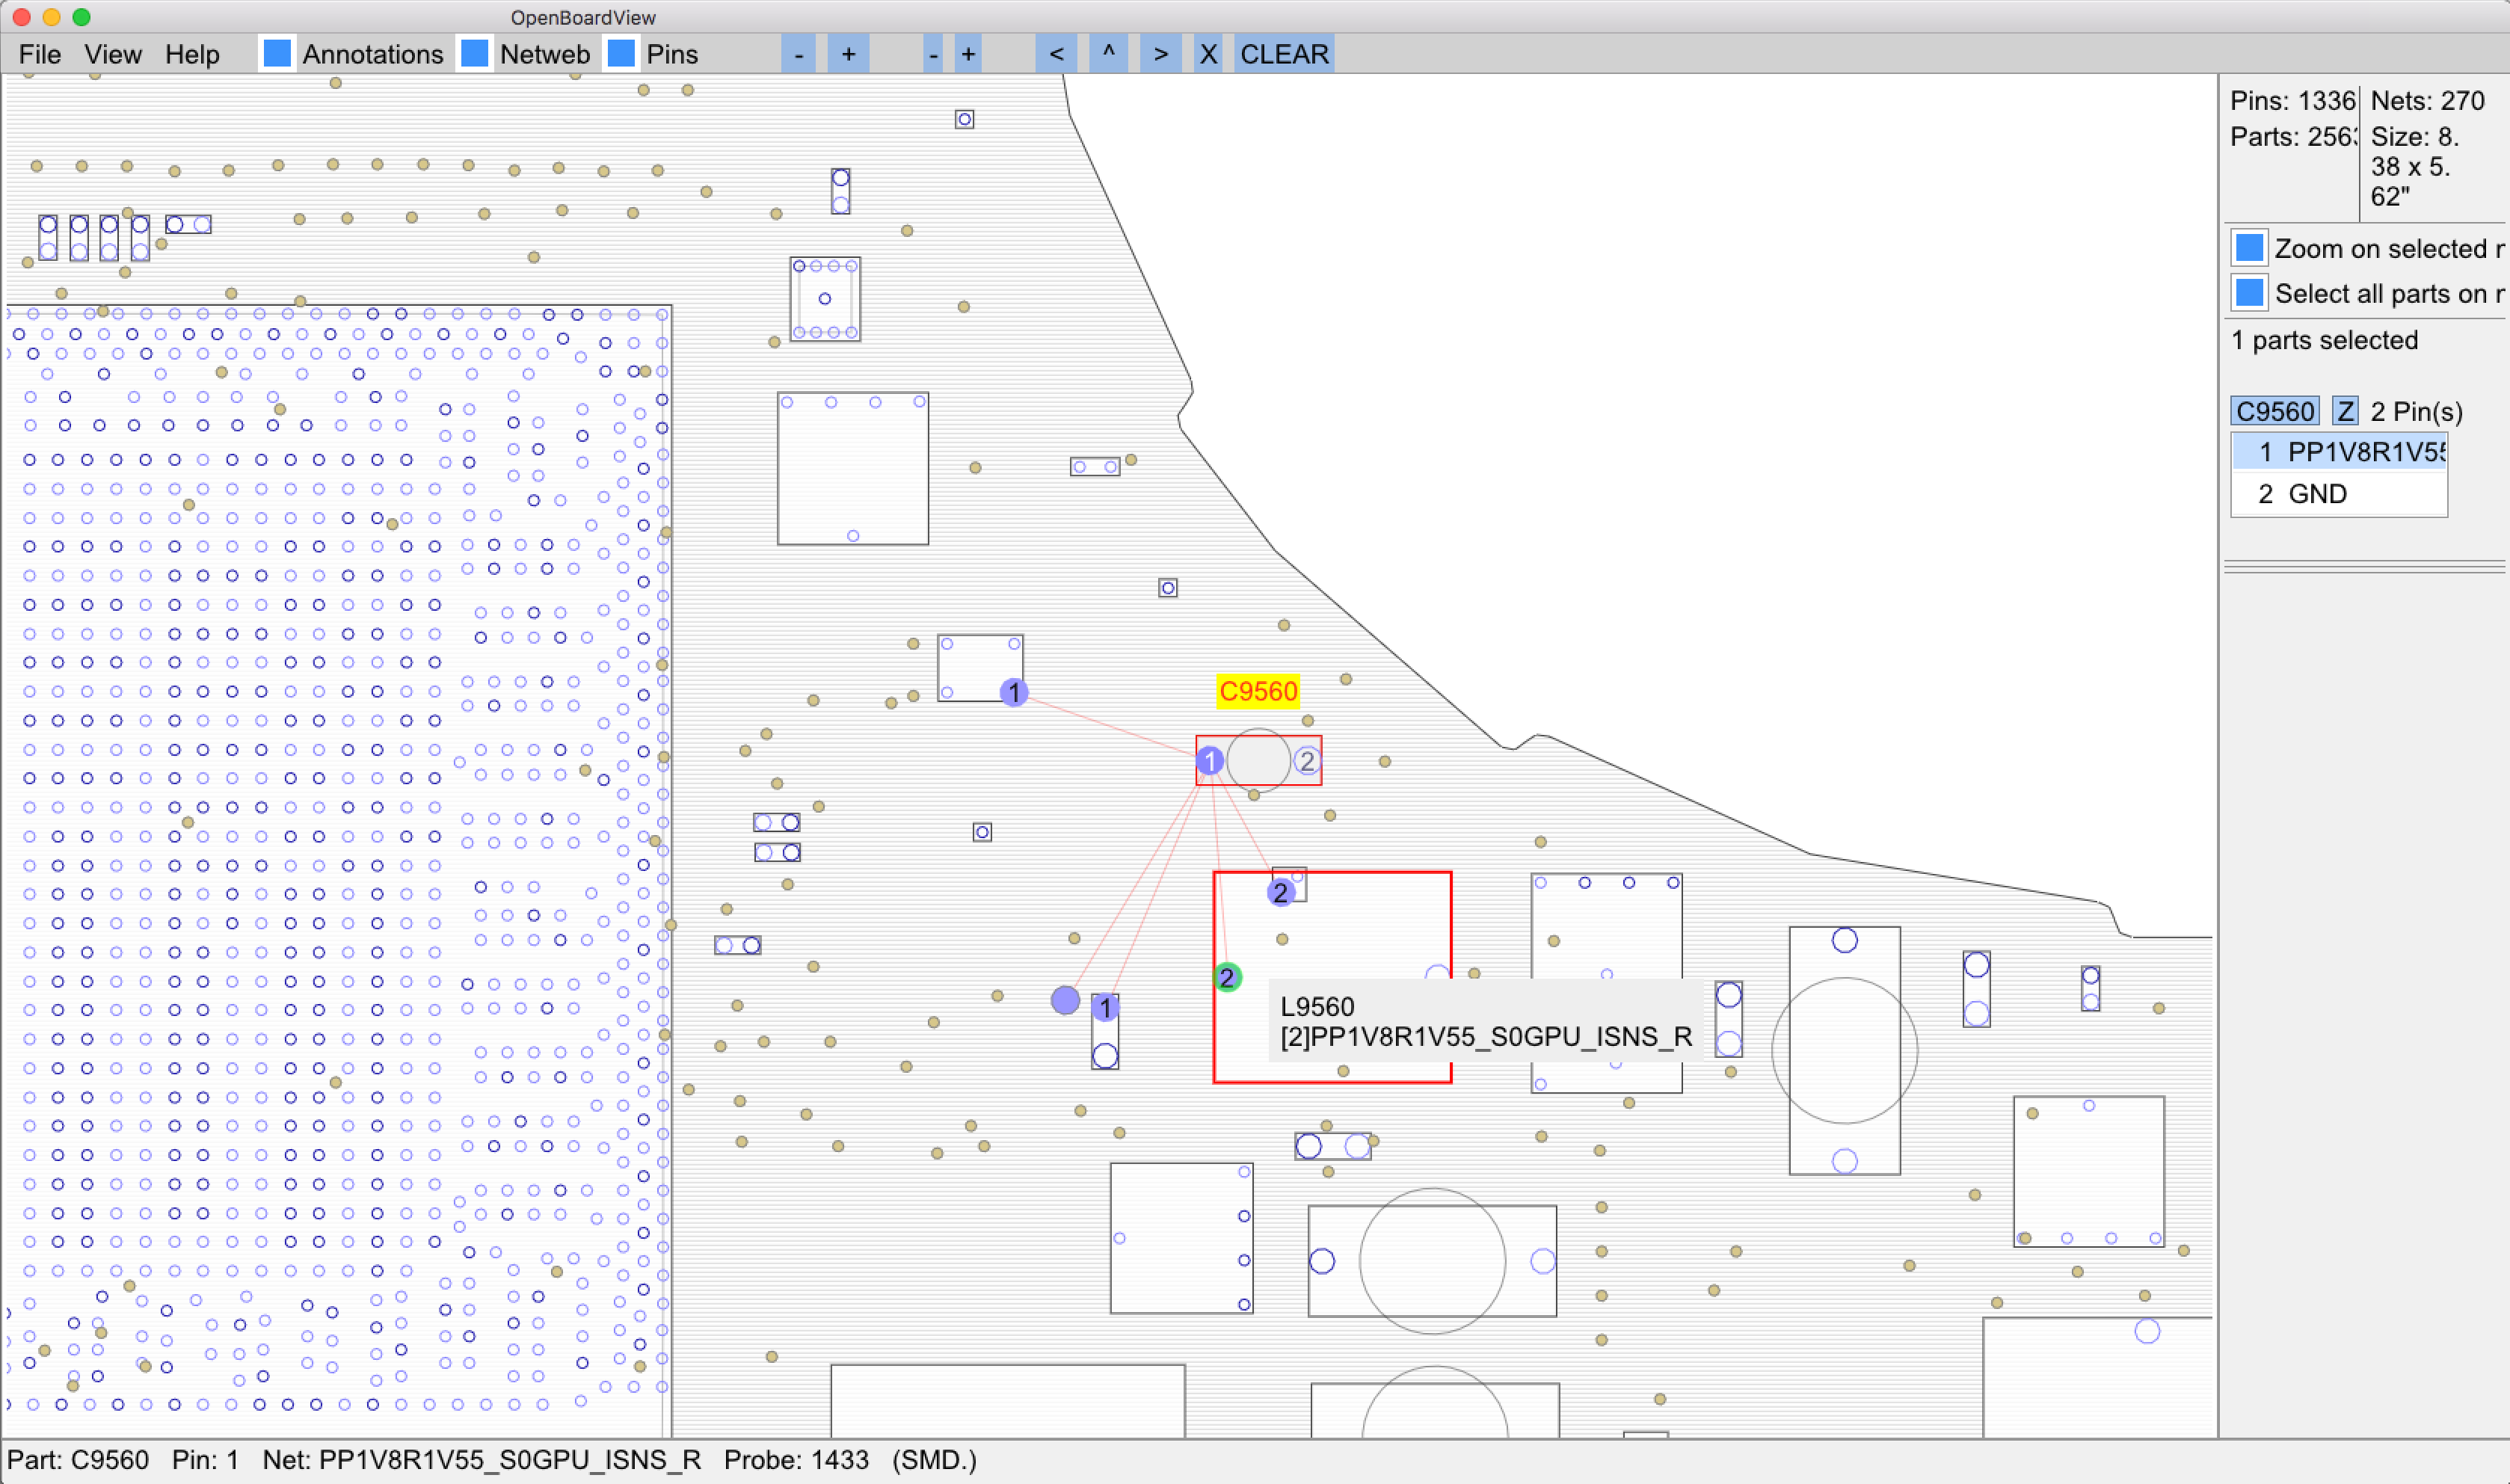
Oh, so that’s where it is! With the boardview file it took all of 2 seconds to find.

Without the schematic you’re nowhere. Without the boardview file you’ll just end up never finding the component you’re looking for or wasting ridiculous amounts of time trying to find it. You need both and you (might) need the above mentioned videos too.
As I mentioned, I’ll follow up when I receive the rest of my tools but I want to leave you with the biggest and best resource you will find anywhere. I am so lucky I stumbled onto this as I was waiting for my tools to arrive. It’s a Youtube channel that belongs to Louis Rossmann and he repairs logic boards, records it, explains what he does and how he does it while doing it and makes it available for free so anyone can learn. You must check it out and spend some time browsing his videos, the dude is awesome. In fact, why don’t you go and do that right now? Riiiiight now.
3 thoughts on “My road to logic board repairs”
This is amazing Jay.
I do the same thing with the bicycles. I guess each industry has its flaws and they make tons of money and crest a lot of useful waste.
So I am repairing bikes parts that other shops considered 100% broken.
Learned how to trouble shoot electric motors for bikes and learn to weld and solder on my own.
Now, even other shops started to send people on my way.
Keep on the good work. Yes, it is expensive at first. But it is an investement to a brighter future.
Cisco
Manager and Head Mechanic
N+1 cyclery
Framingham, Massachusetts.
Great tutorial! How did you get the OpenBoardView build to run? I have tried it on my macbook, ran it on a windows vm and ubuntu vm. All the builds failed and i am no expert in the languages used here so I was wondering if you ran into the same issues and had to find a work around? Thanks
For the free version I just downloaded and ran it on macOS without issue. I have since moved to the paid FlexBV which also runs on macOS fine. At the time of writing this comment, OpenBoardView-9.95.0-Darwin.dmg from their github runs well on macOS Mojave-Ventura.